Your site files are hosted in a private repository that you can modify using git, or using the BowTie editor. Visitors access your static site using Domains configured to point to your _site directory.
BowTie projects are created with a hosted domain (e.g. ‘example.bowtied.io’) and two environments (test, and live). You can add additional domains to customize the URL or to point to custom environments or branches within your repository.
This guide will explain how to configure domains on new and existing projects.
Hosted Domains
Setting Initial Domain on Project Creation
Create a brand new BowTie project by clicking ‘+Add Project’ from the top navigation of the BowTie dashboard, or clicking here.
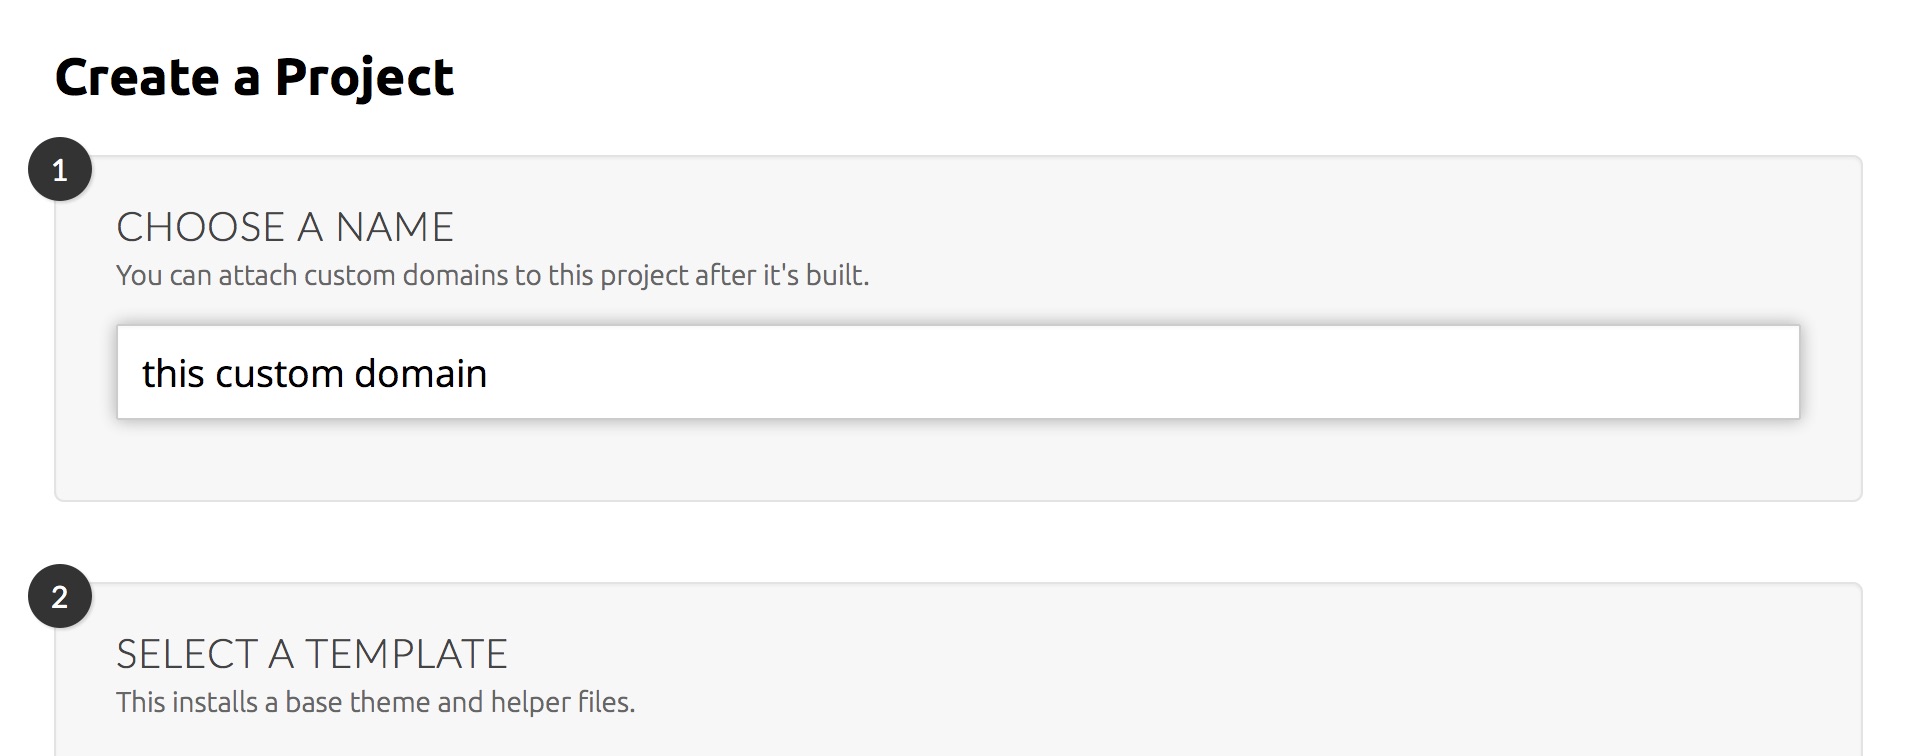
Step 1: Choose a plain text name for your project. The hosted domain for your project will be based on your project name. If you select ‘this custom domain’ your default live domain will become ‘this-custom-domain.bowtied.io’ and default test domain will be ‘this-custom-domain-test.bowtied.io’.
Step 2: Select a template and click the ‘Add Project’ button. This will begin the installation process (which takes a few minutes).
If you have several projects, you can leave this screen once installation begins. The process will run in the background.
You can check the status or return to the process by clicking the alert indicator on the top right of your dashboard. You will receive an email from the BowTie System explaining how to access your files.
When the build completes, click the ‘Roll Out’ to access your dashboard and begin using your repo. Files will now be available at the address above.
Adding a New Domain (hosted)
You can add or reassign domains to any environment defined in your project. Each project is allotted up to 10 domains, as determined by your plan.
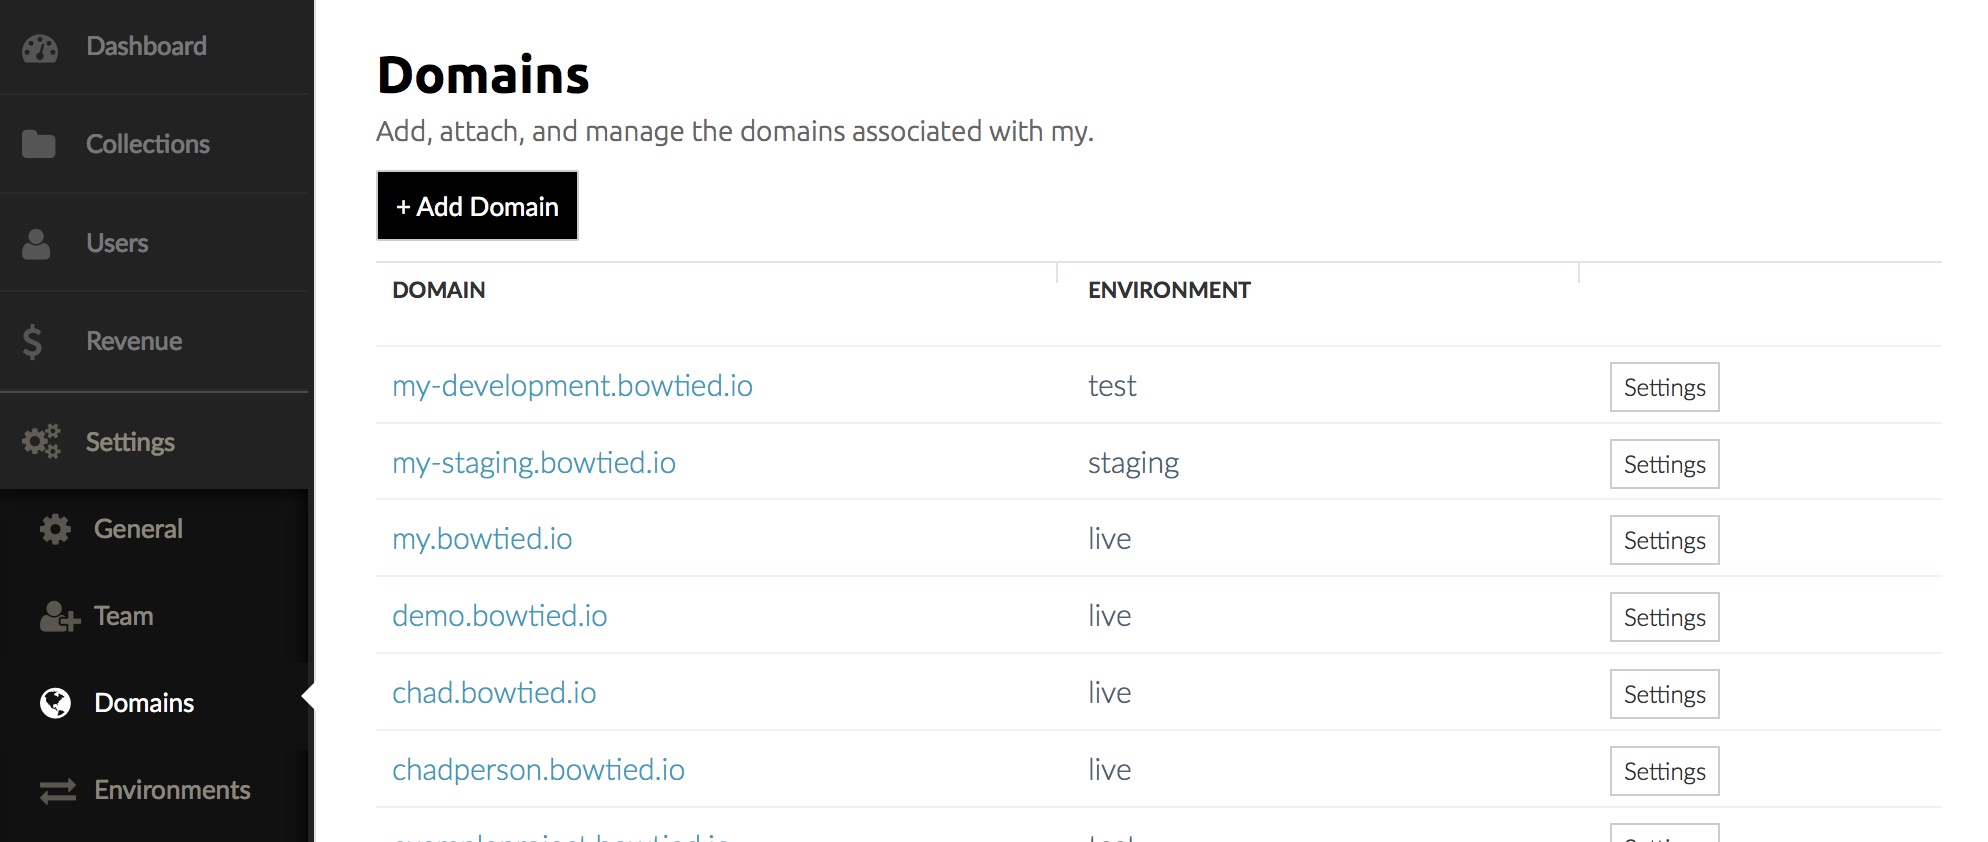
- From the project dashboard, visit the Settings > Domains page and click ‘Add a Domain’.
- Type a plain text domain, and select the environment you wish to add the domain to. BowTie will automatically configure DNS and SSL for that domain.
- Click ‘Add Domain’ to being installation. The process will complete in a few minutes. You can leave this screen. Check the status, or return to the process by clicking the alert indicator on the top right of your dashboard. You’ll receive an email when the process completes (or fails).
Removing and Editing Domains
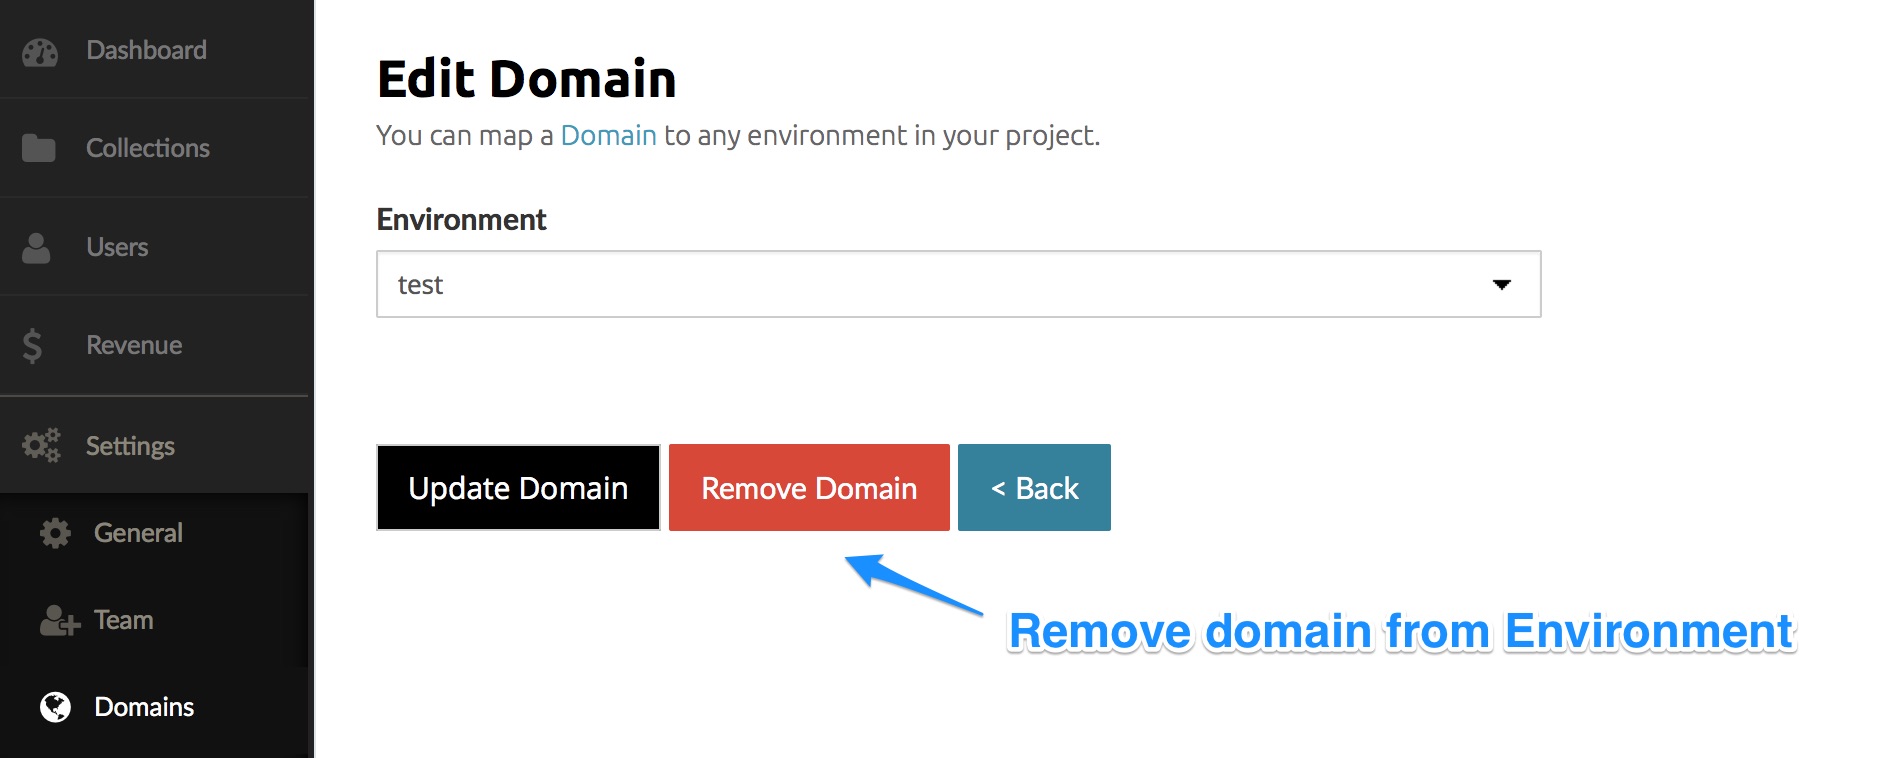
To remove an existing domain, click the ‘Settings’ button on the Settings > Domains page next to the domain you wish to modify, then click the ‘Remove Domain’ button.
Note: Custom domains purchased on BowTie that have been removed from a Project can be located and re-assigned from the Account > Purchased Domains page.
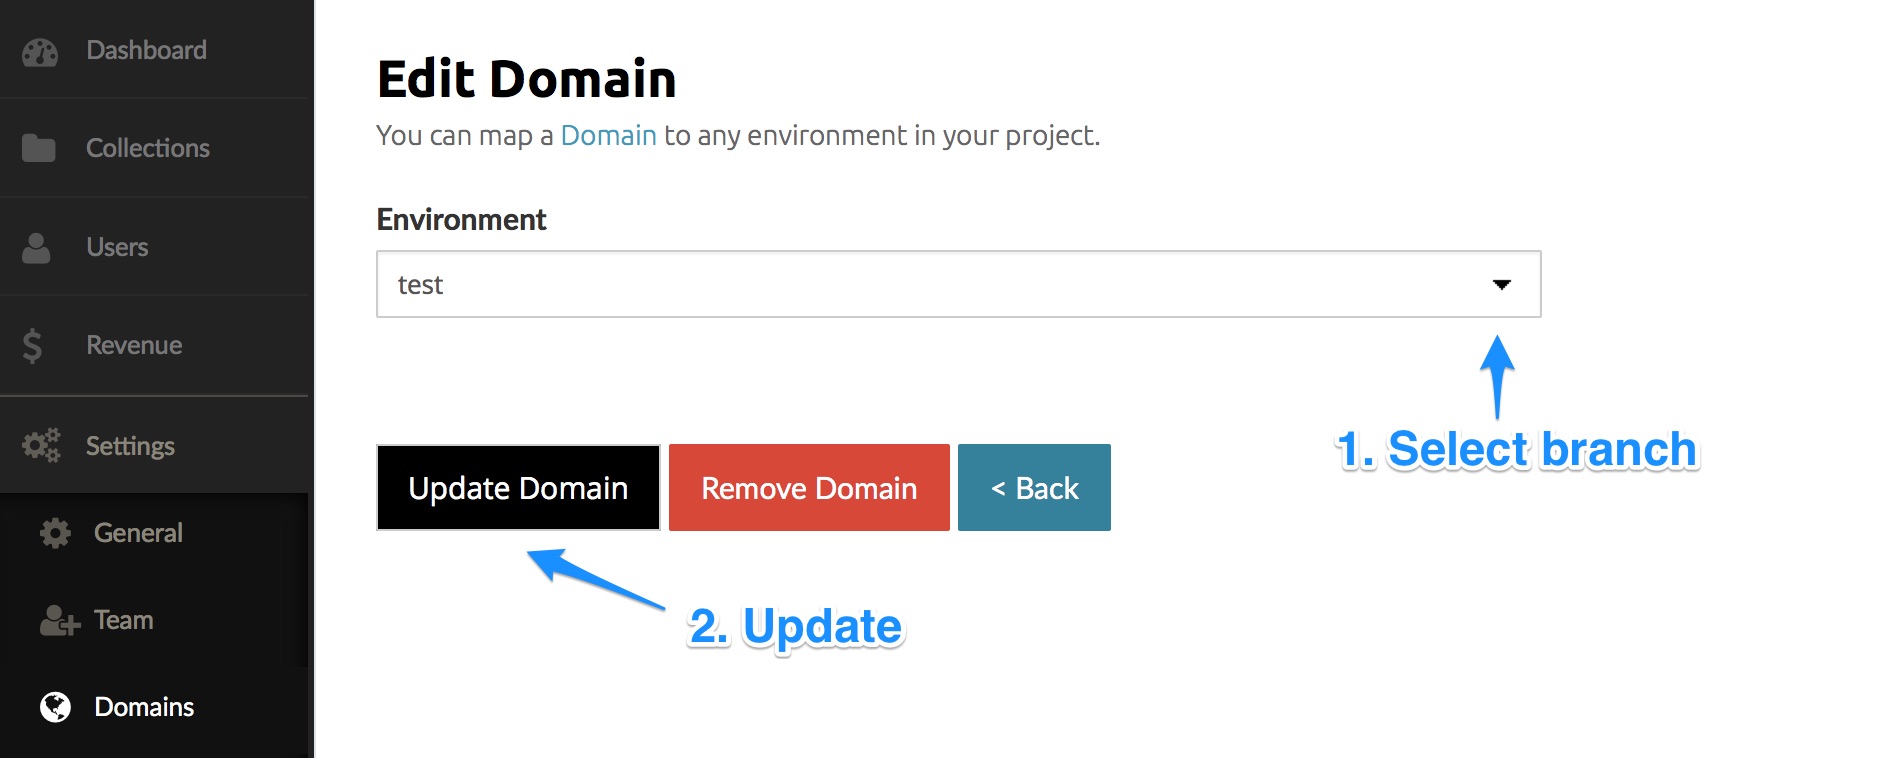
To edit or reassign an existing domain, click the ‘Settings’ button on the Settings > Domains page. The process to reassign a domain is two steps:
- Select the environment/branch you wish to assign the domain to from the drop down list. Note: If you don’t have an available environment you can create a new environment.
- Click ‘Update Domain’ to save your changes. The domain installation process will begin. You will receive an email when it is complete.
Custom Domains
Purchasing a Domain on BowTie
If you have a payment card on file, you can purchase new custom domains directly from the ‘Add Domain’ screen.
This is the easiest way to use a custom domain on BowTie. Custom domains vary in cost. The amount is determined and presented when you add a TLD in the field (e.g. ‘example.co’). We automatically include and configure SSL certificates for every custom TLD added to your project.
- To purchase a new custom domain, visit the Settings > Domains page and click ‘Add a Domain’.
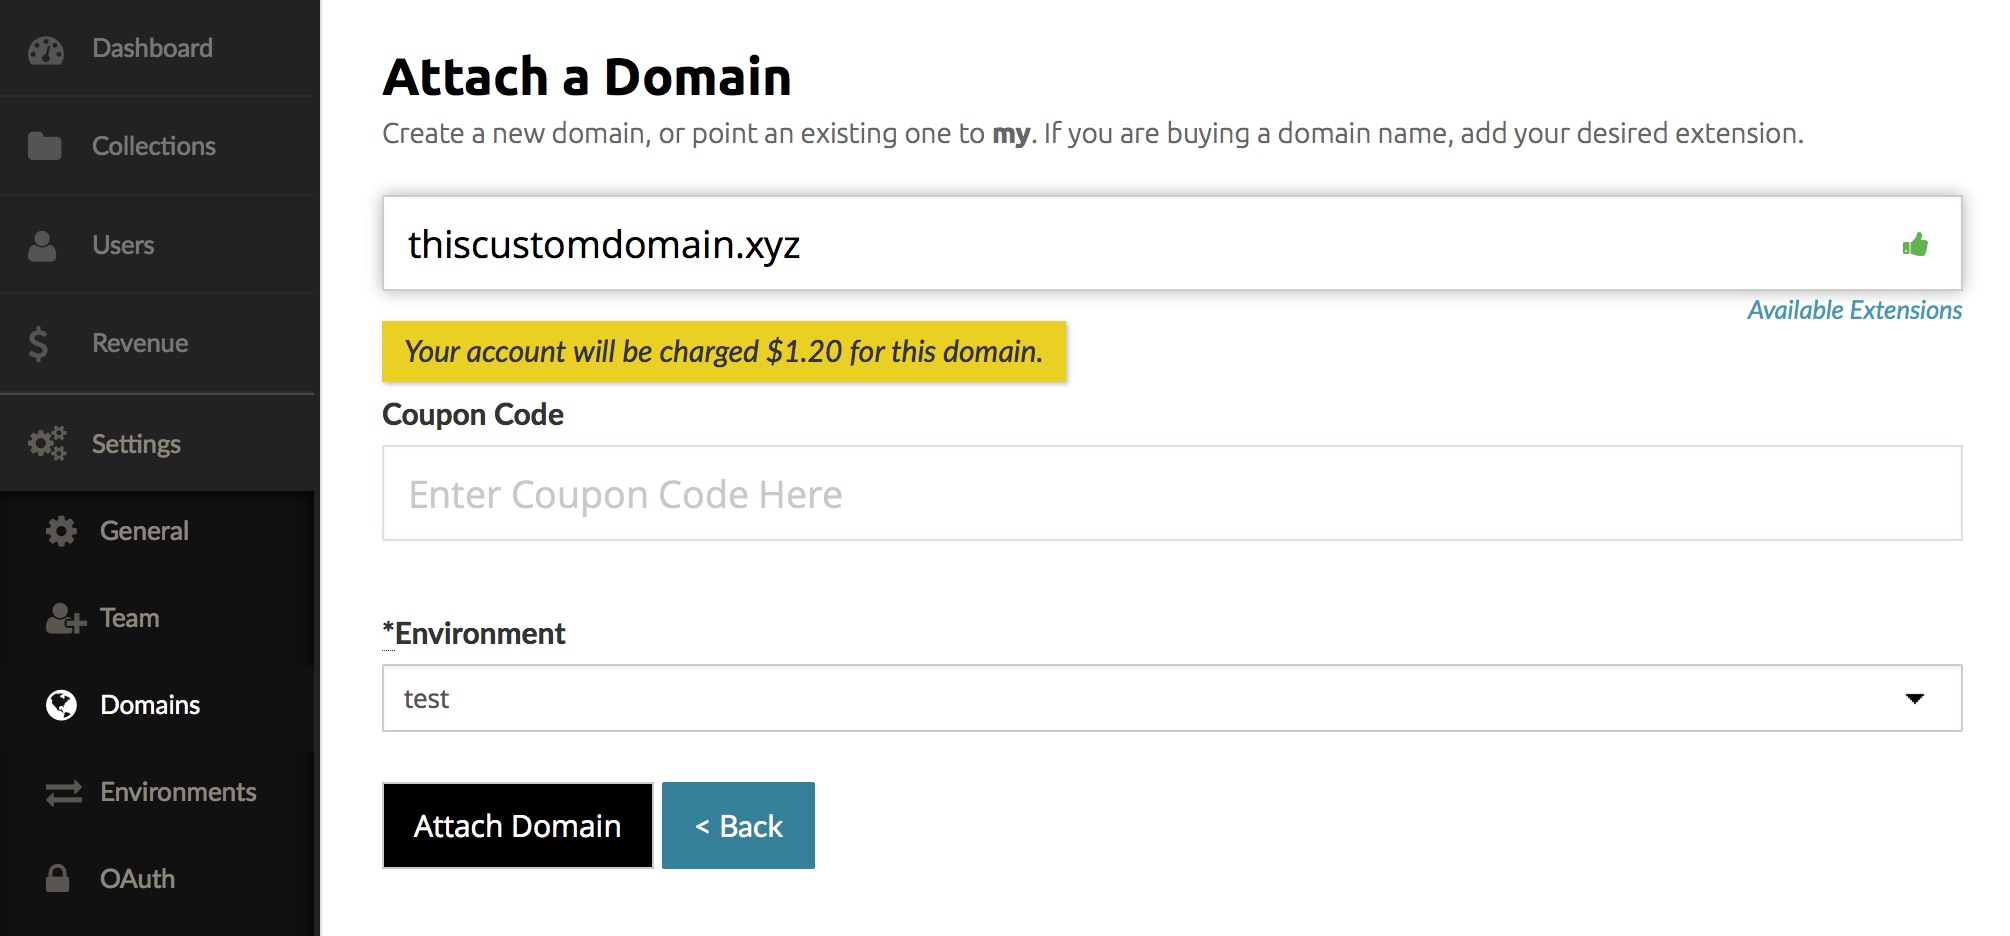
- Type your desired domain including the TLD (e.g. ‘thiscustomdomain.xyz’). The price will vary based on the domain you are trying to register and you need to have an active card on file in order to purchase a domain.
- Now, select the environment you wish to add the domain to from the dropdown and click ‘Attach Domain’. BowTie will automatically configure DNS and SSL for this custom TLD.
- The installation process will complete in as little as a few minutes but may take an hour to propagate. You can leave this screen and check the status, or return to the process by clicking the alert indicator on the top right of your dashboard. You’ll receive an email when the process completes.
Adding a Domain Purchased Elsewhere
You can configure your BowTie project to work with with domains or subdomains purchased elsewhere. Follow the instructions below to complete the process:
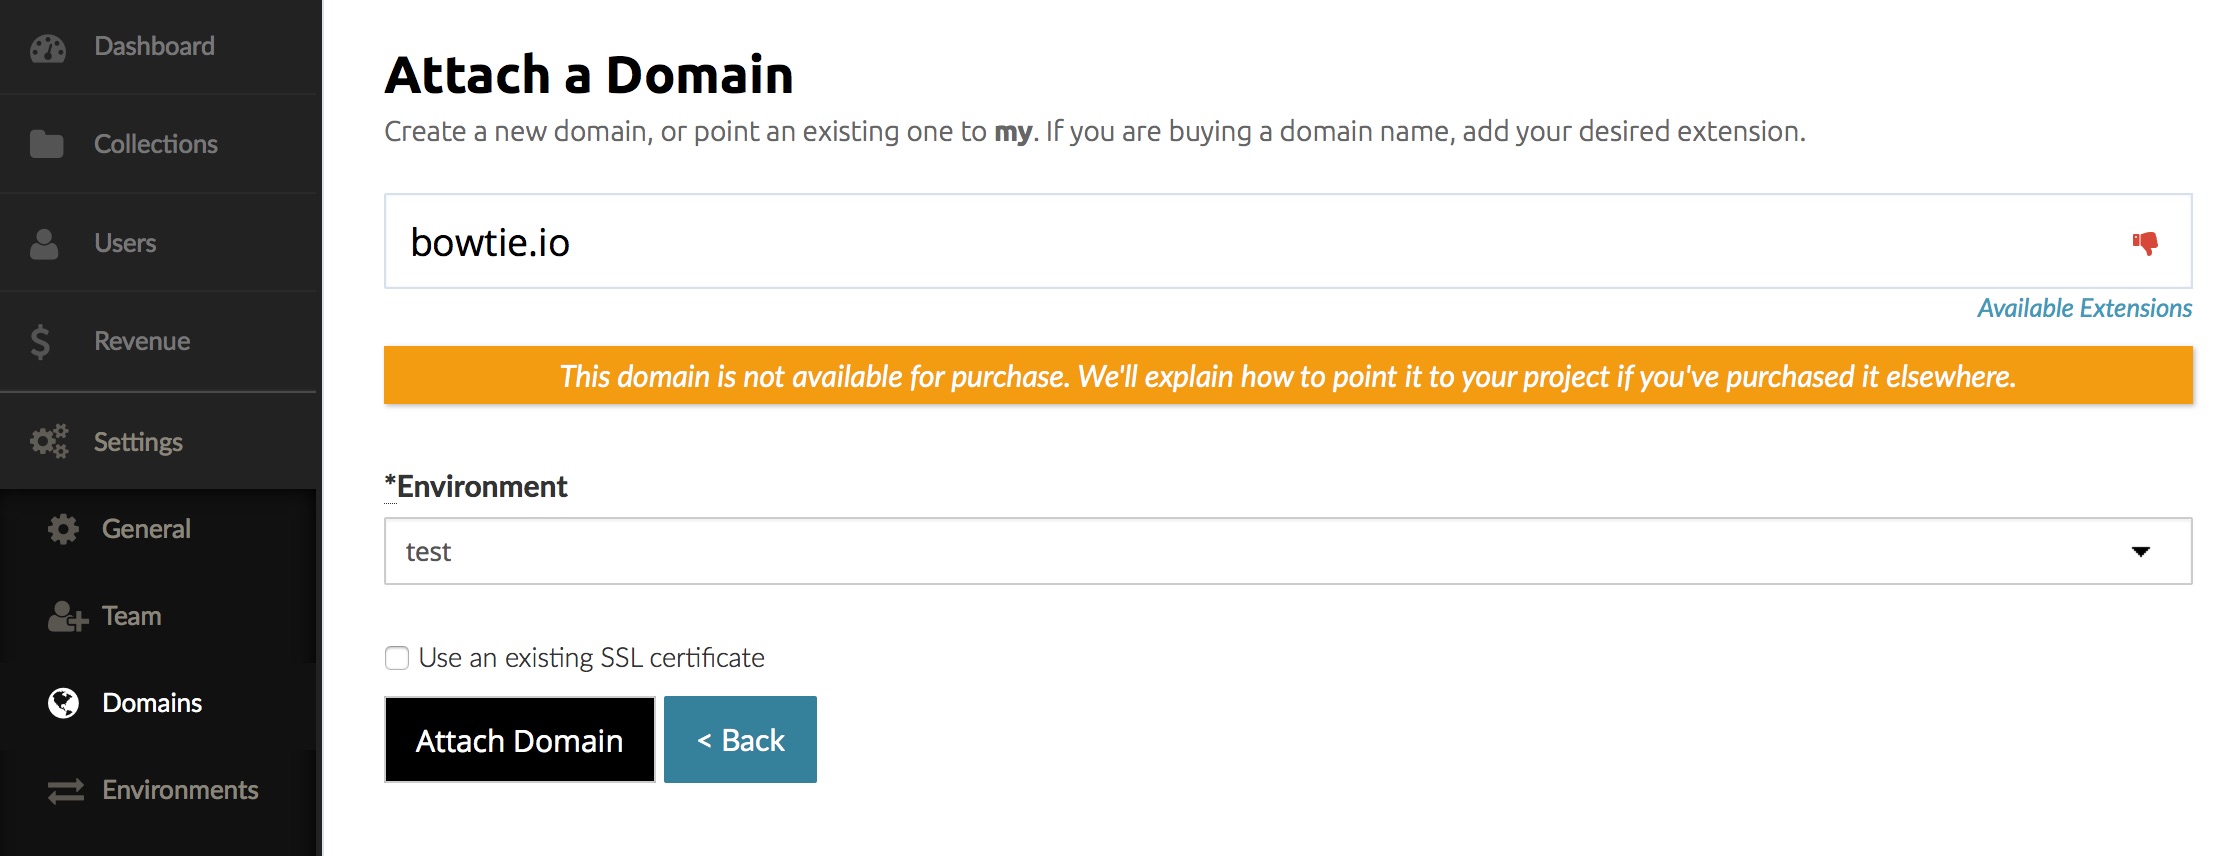
- Navigate to the ‘Add Domain’ interface found at ‘Settings’ > ‘Domains’, and enter the domain name you would like to point to your BowTie project. You will see a prompt to alert you that the domain is not available for purchase, and that you can proceed if you own it.
- Select the environment you would like to associate with this domain, to (e.g. ‘live’ or ‘test’), and click ‘Add Domain’. Note: If you don’t have an available environment you can create a new environment.
- Click ‘Add Domain’. This will being a multi-step installation. BowTie will assign an SSL certificate for your domain, then provide you instructions to configure your domain’s nameservers.
- After receiving the list of nameservers from the BowTie interface, navigate to the nameserver configuration at your registrar and make the suggested changes. You will also receive an email containing the nameserver settings.
- When you return to BowTie, Click ‘Resume’ on the installation page to continue the installation.
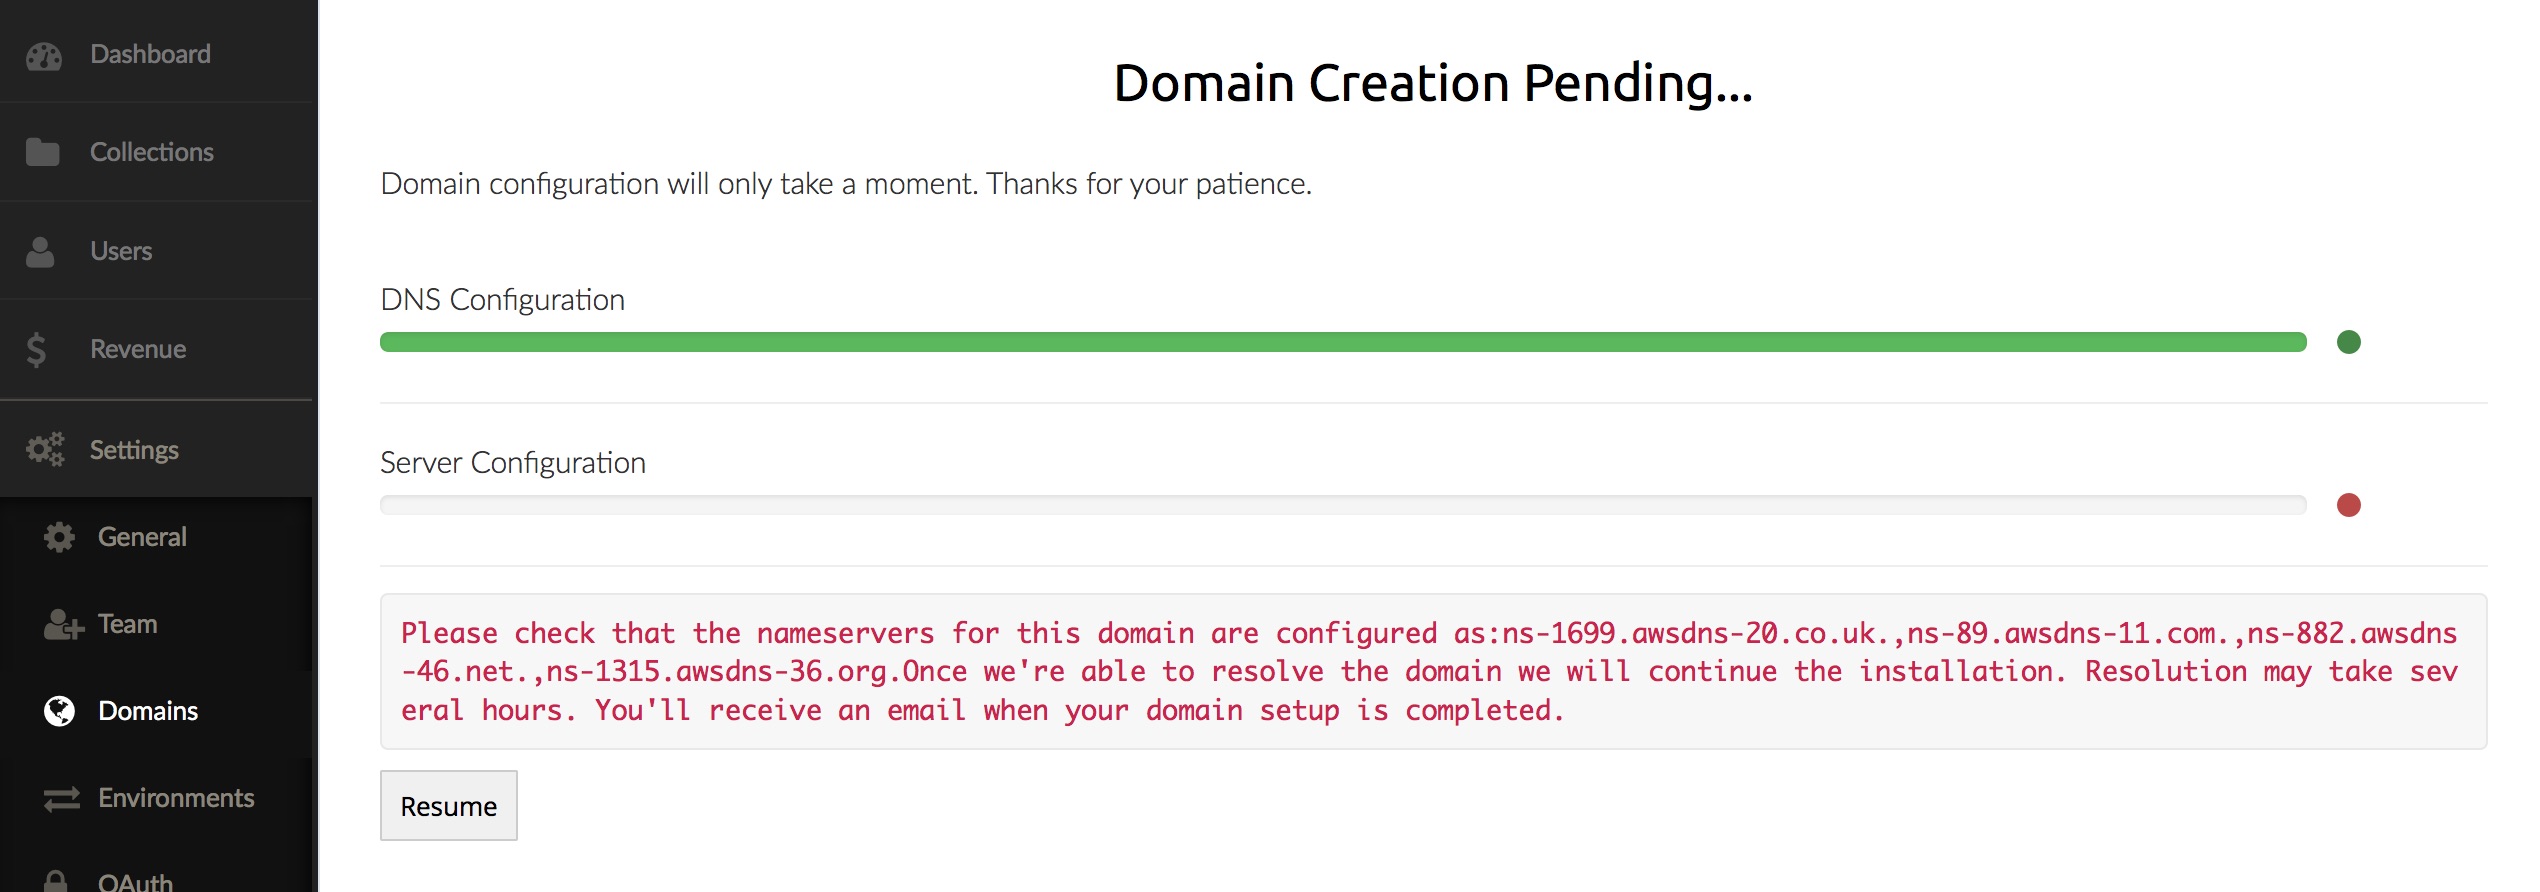
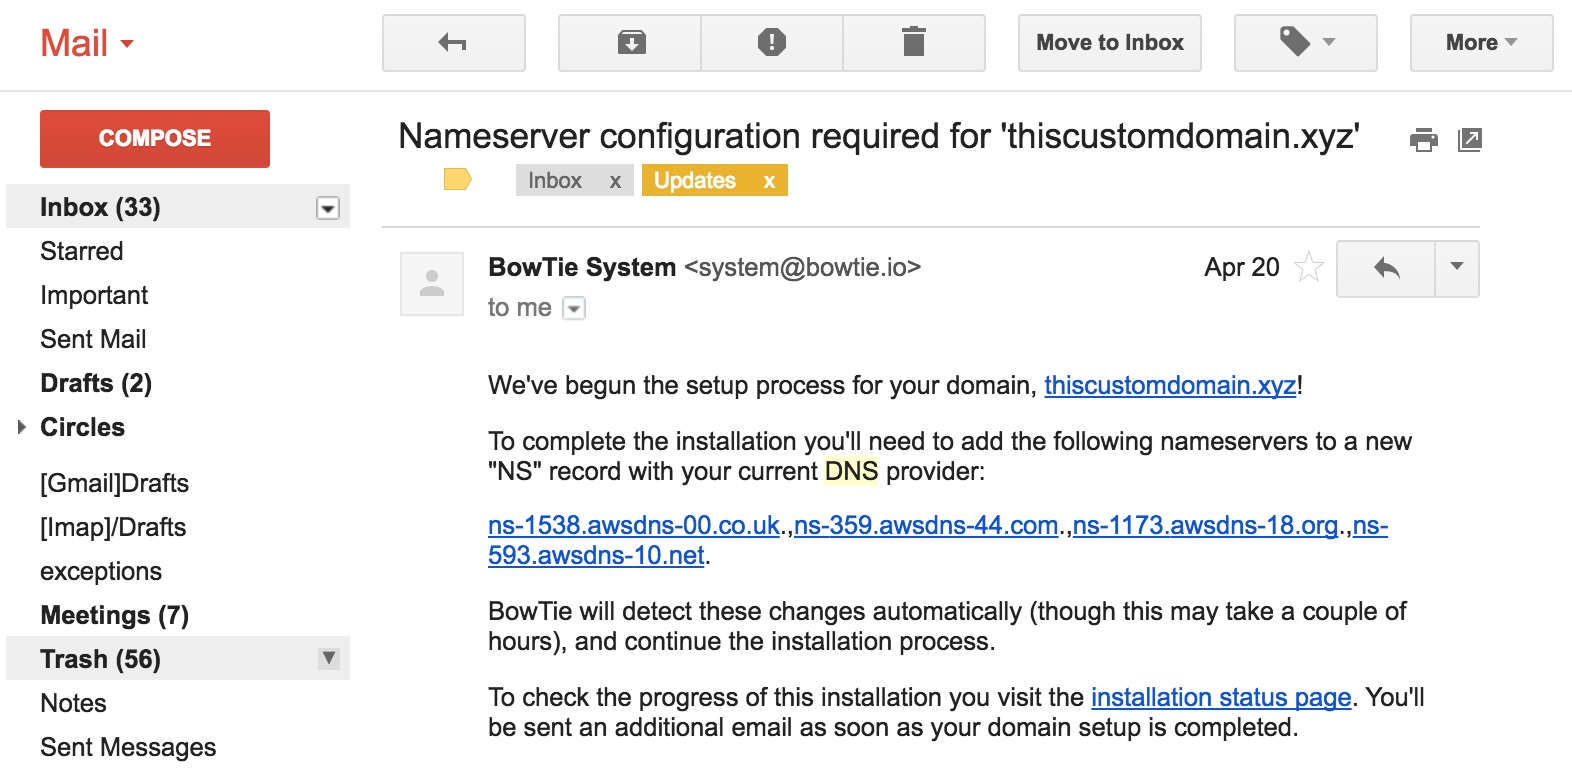
Please ensure that you’ve updated your DNS properly and give them time to resolve. The installation process may complete in as little as an hour, but may take 24 hours to propagate.
You can check the status, or return to the process by clicking the alert indicator on the top right of your dashboard.
Configuring a Subdomain
Subdomains (e.g. ‘project.example.com’ or ‘www.example.com’) are treated like any other domain on BowTie and can be assigned to any environment defined in your project.
- From your dashboard, visit the Settings > Domains page and click ‘Add a Domain’.
- Next, type the subdomain (for a domain you already own or manage) into the field and select the environment you wish to add the domain to.
- Click ‘Add Domain’ to begin the installation. BowTie will automatically configure DNS and SSL for this subdomain.
- If you would like your BowTie site to appear as a subdomain of a property hosted elsewhere, the installation instructions will be similar to the steps in ‘Adding a Domain Purchased Elsewhere’
The installation process may complete in as little as an hour, but may take 24 hours to propagate if you have to change nameservers. You’ll also receive an email when the process completes. You can check the status, or return to the process by clicking the alert indicator on the top right of your dashboard.
Using a third party DNS provider to Control Subdomains
Some registrars will not provide the ability to update DNS settings for a subdomain. In this situation, we recommend you use a third party DNS provider that supports this such as DNSimple or DNS Made Easy.
You can also use a CNAME record to point to your BowTie Project at the ‘x.bowtied.io’ domain (where ‘x’ is the portion of the domain chosen for your project).
Other Domain Features
Google Apps Email Configuration
Your BowTie project is preconfigured to use Google Apps for email. Using Google Apps Email requires zero configuration. We automatically install the required MX records with every domain added to your project.
To verify ownership of your site, we recommend using the META tag method.
One of the best reasons to use Google Apps with your BowTie account is that you have the ability to leverage the Zapier Gmail integration. Combined with our integration you will have a number of options for contact forms and lead generation.
Note: BowTie does not directly suport the customization of MX records within the Dashboard. Contact us for assistance in setting up other custom MX records.
Custom Test Environments
Environments allow you to separate test users, transactions, and project settings from your primary Live application. Environments are associated with a unique domain, and can be associated to a unique branch in your repository.
To create a new Staging environment:
- Create a new domain under the ‘More’ > ‘Domains’ tab in your BowTie dashboard (set any environment initially).
- Visit the ‘Environments’ tab in your dashboard and select ‘Add Environment’
- Name the environment (e.g ‘Staging’), choose a branch from your repository (e.g. ‘/staging’), and point it to an available domain (such as the one you just created).
- Toggle ‘Use Stripe Live Mode’ if you intend to take real transactions in this environment, or leave it unchecked for test transactions.
Learn more about adding environments.
If you are new to BowTie, check out our other Getting Started guides.
Getting Started with BowTie:
- Build a Landing Page in 5 minutes
- Using the BowTie Collection Editor
- Initial Configuration
- Setting Up Custom Domains
- Customizing and Styling BowTie frontend content
- Build a website with a pay wall
- Blogging with BowTie
- Launch a simple donation site
- Using BowTie’s User Profile system
- Build a Daily Deal Site with Jekyll Collections
- Using Jekyll Data to extend your site
- Adding BowTie users to MailChimp with Zapier
To keep up to date, follow us on twitter at @bowtie_io
Questions? Please comment! Thanks for your support and feedback.