
One of the most powerful features baked into BowTie is the hosted blog. You can use BowTie as a standalone markdown blog, or use our proxy to link a BowTie marketing site to another URL or subdomain.
If you installed the BowTie blogging template, or any template that includes blog components, you can begin publishing content immediately. Developers can build custom editing interfaces with very little markup, making content creation incredibly simple for less technical users.
Example BowTie Blog

Your default blog index page will be found at PROJECTURL/blog/.
Getting Started
BowTie blog pages and posts are built using Jekyll, and support Markdown - the same lightweight, plain text syntax behind popular services, like Github pages and Ghost.
The files making up the default BowTie templates are a mix of Markdown and HTML. You can edit these files with any text editor or the editor available in the BowTie dashboard.
This post will teach you how to publish your BowTie blog, give you a basic understanding of Markdown, and illustrate a few of the extras built into our default theme and templates. The source of the tempalte used in this example can be found on the BowTie github page.
Working with the Online Editor
BowTie provides a simple hosted editor for creating, editing, and removing markdown content in your repo. You can use it to author posts, or work with any collection-based content (extending Jekyll Collections).
BowTie Markdown Editor

This interface allows you to add, duplicate, modify and remove markdown content within your browser. Tools are shown below:

Saved changes will be wrapped into a git commit and deployed to your repo, triggering a a build on the BowTie server.
Front matter variables (post settings) can be accessed by toggling the edit mode, which will reveal the form editor shown below:

Developers can extend the form editor to provide a customized editing interface for content creation. For more information on form-based content, read our guide on customizing the BowTie Editor for clients.
Note: Drafts are not presently available in the online editor
Adding Authors
If you are using a BowTie template, you can add authors with the online editor. Each author is defined with a markdown file in the _authors directory. Our standard components will use the author’s displayName, avatar, gravatar, social handles, etc. in posts, post summaries, article headers and open-graph information.
After you have added an author, set the author in the post/page front matter with the value from the author’s ‘name’ field.

Configuring your Site
If you haven’t already done so, we recommend configuring your site prior to publishing any content. Most site settings will be found in your _config.yml file. For a complete walk-through of a site configuration, read our guide on Initial Configuration.
Working Locally
For the most flexibility, we recommend cloning your repo and setting up a local environment. The BowTie Client provides the same functionality as the Jekyll development server with some additional features designed for BowTie-specific integration.
Install the BowTie Client, then navigate to the local version of your repo and run bowtie serve.
Your site will be visible at localhost:4000. Changes will render in real-time, unless a syntax error occurs, which could stall the client or prevent it from launching. If this happens, quit and restart the client. Errors will be displayed the next time you run bowtie serve.
Writing Drafts
To author new posts in draft mode, compose your posts in the _drafts directory. This directory and the posts it contains will be excluded when you serve and build your site.
File naming is important. Jekyll requires blog post files to be named according to the following format: YEAR-MONTH-DAY-title.md
To preview your drafts locally, run bowtie serve --drafts and view your site at localhost:4000. This will add available draft posts to your blog. *If you omit the --drafts tag, you will not see your drafts. Once the draft is completed, move the file to the _posts directory for publication.
We include a sample ‘draft’ post with our default theme as an example. You should delete this post before publishing.
Note: Drafts are not presently available in the online editor
Previewing Content
Completed blog posts should be moved to the _posts directory. When you push content to your BowTie repository (repo), or run jekyll build_*_, these files will be rendered as permalinks, added to your blog index, and included in your site ‘feed.xml’.
We include a ‘Welcome’ post with our default theme. You should delete this post before publishing your blog.
To see your posts locally, run bowtie serve and view your site at localhost:4000.
Note: Previewing some features may require you to build your site by running jekyll build.
Publishing Posts
When you are ready to publish your blog, make sure any posts you want to publish are in the _posts directory.
BowTie provides push to deploy functionality. When you are ready to publish, run git push on your desired branch.
When you push files to the BowTie repo, we will automatically build and deploy your site. You do not have to run jekyll build ahead of time.
For more information on writing posts, we recommend you read the Jekyll docs.
BowTie Theme Extras
Our default themes include a number of features that make publishing on BowTie more powerful, including global authorship, categories, seo, disqus comments, analytics and social sharing components.
Settings for most of these components are configured in the post front matter (the area at the top of the post surrounded by dashed lines - accesible in the form editor). Global configuration settings are ususally found in your _config.yml. Advanced component settings are typically modified inside the _includes directory of your repo.
For a complete list of available templates and components, read our Docs.
Configuration variables
Most of the BowTie theme extras can be configured on a post-by-post basis using the YAML front matter settings shown below.
Default post front matter
---
layout: "post"
title:  "Welcome to your RazorSite Blog"
subtitle: "We wrote this cheatsheet to get you started."
author: "john"
date: "2015-02-06 15:36:37"
masthead:
  img_path: false
  pat_path: "/img/backgrounds/bg2.jpg"
categories:
  - "Hello World"
  - "BowTie"
elsewhere:
  name:
  url:
comments: true
share: true
seo:
  title: my post rules
  description:
  canonical:
  noindex: false
social:
  title:
  description:
  img_path:
---
There are several default variables available, and you can add you own. To learn how to modify the default _config.yml and template files to accept custom variables, read this post.
Blog Layouts
The default BowTie theme uses three layouts to control the look and feel of your posts. These can be found and modified in the _layouts directory.
Blog posts use the post.html and fall back to the blog layout type. Within the post layout, you’ll find several if statements enabling the inclusion of other theme additions (like authorship variables). For example:
{% if page.author %}
by <a href="//twitter.com/{{ author.twitter }}">{{ author.displayName }}</a>
{% endif %}
The blog layout frames the post content with additional components (header, analytics, etc.) and layout elements such as the masthead.
The blog-index layout is used by pages that compile lists of posts, such as the blog index page (blog.html) and categories page (archive.html). This allows you to provide different styles and behavior than standard pages using the default layout.
Masthead images
The default BowTie theme includes ‘masthead.img_path’ and ‘masthead.pat_path’ variables in the post YAML front matter. When used, these variables place a background image behind the post title and subtitle on the post permalink.
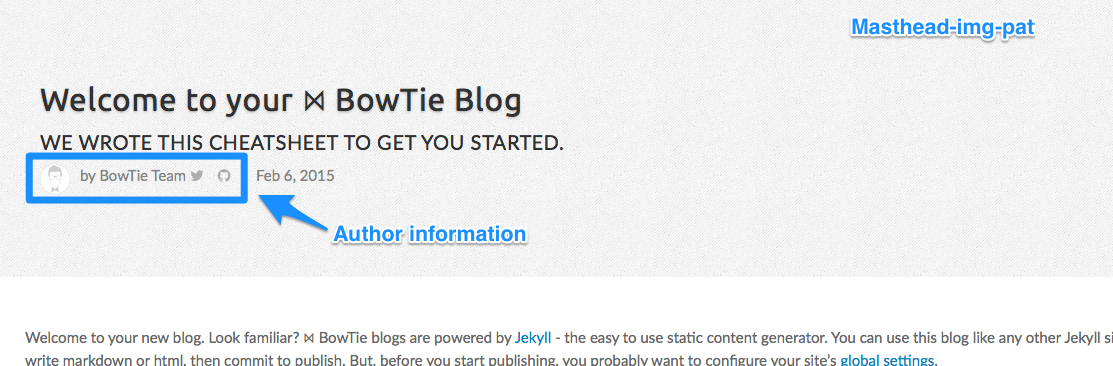
The masthead image variables are mutually exclusive. You can upload and replace masthead images using the form editor, or by modifying the code as shown below:
The sample post uses the masthead.pat_path variable and sets the masthead.img_path variable to ‘false’. This inserts a background pattern image, set to repeat.
Example masthead image variables
---
masthead.img_path: false
masthead.pat_path: /img/backgrounds/pattern.jpg
---
If you would like to have a single image cover the masthead, add you image url to the masthead.img_path variable.
---
masthead.img_path: /img/backgrounds/full.jpg
masthead.pat_path: false
---
Categories
For convenience, we ship an example archive page - archive.html - that rolls all posts into a list of permalinks based on their set categories.
Post categories are included in the front matter as plain text, and can be configured in the online editor. To add or remove categories in the online editor, click the ‘+ Add’ or ‘-‘ buttons.
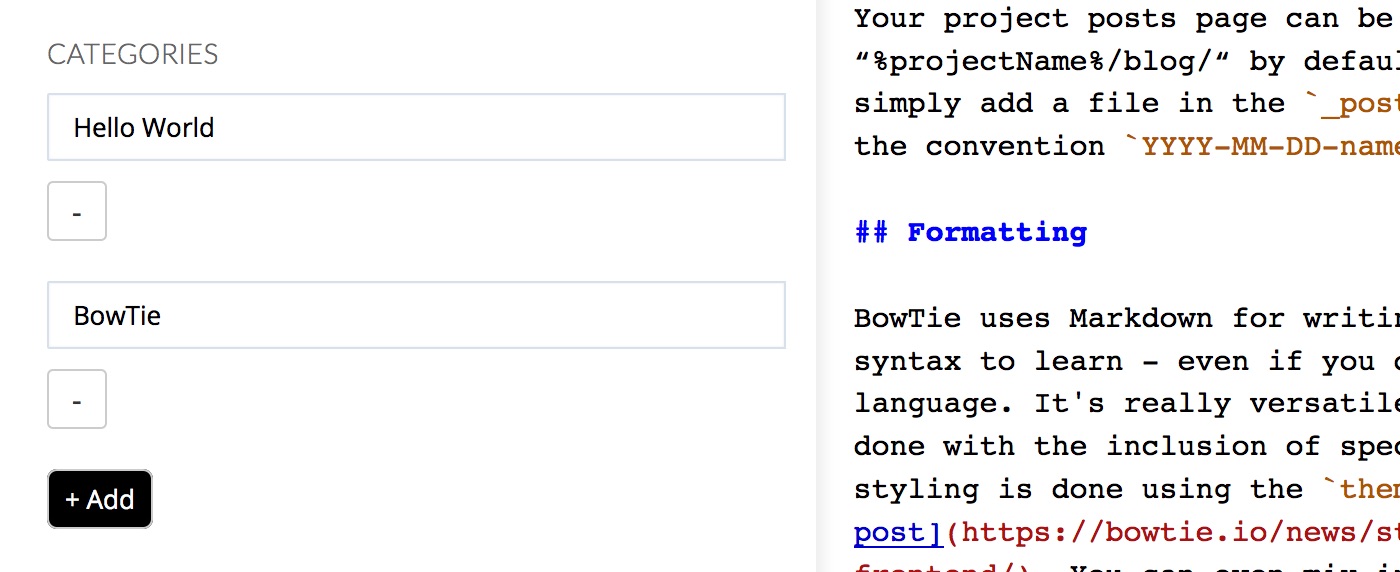
---
categories:
  - Hello World
  - BowTie
---
If you want to dive into the logic around build categories, reference the two associated components used to build the page: categories.html and category-list.html.
Elsewhere Links
To easily append a link to a source or reference blog, we added the ‘elsewhere.name’ variable. Using it will add a link to the external article in your post meta information.
These values can be set in the online editor, or in the front matter as shown below. In this example, I am linking to an existing post on Medium:
---
elsewhere:
  name: Medium
  url: https://medium.com/yourpost.html
---
If you leave the elsewhere.name variable blank, the link will not appear.
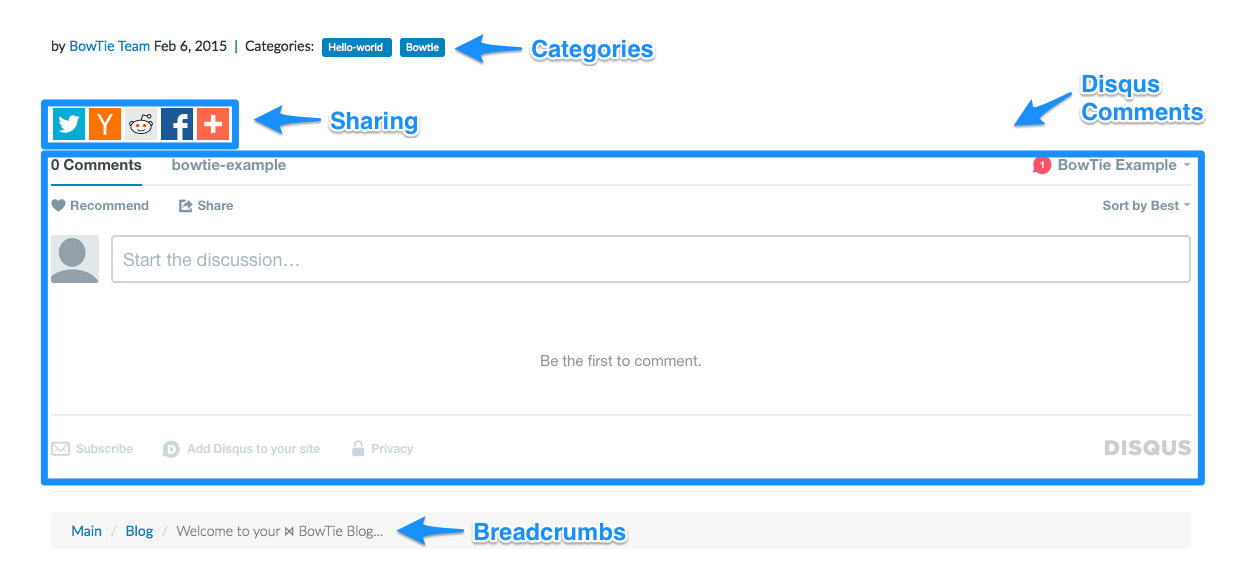
Disqus Comments
Disqus is a great option for adding comments to a static blog, so we’ve included a Disqus component in our default blog template.
Comments are enabled/disabled on a posts by clicking the checkbox in the fields editor, or setting a true/false flag in the post front matter as shown below:
---
comments: true
---
*For comments to function properly, you will need to update the disqus_id in your _config.yml to match your Disqus account. If you don’t have a Disqus account, create one here.
For more information on using Disqus, view their help page.
Social Sharing with AddThis
Similar to Disqus commenting, we have included an Add This component for social sharing integration. This service enables plug and play tools for social sharing, audience targeting, and A/B testing.
To enable sharing on a post, click the checkbox in the fields editor, or set the ‘share’ flag in the YAML front matter to ‘true’:
---
share: true
---
You can include the addthis.html component in any section of your site as shown below:
{% include addthis.html %}*In order for this component to function properly, you will need to update the addthis_id in your _config.yml to match the ID provided in your Add This account.
SEO Tools
Default BowTie Themes use page.seo and page.social to generate social media and search engine optimized web pages.
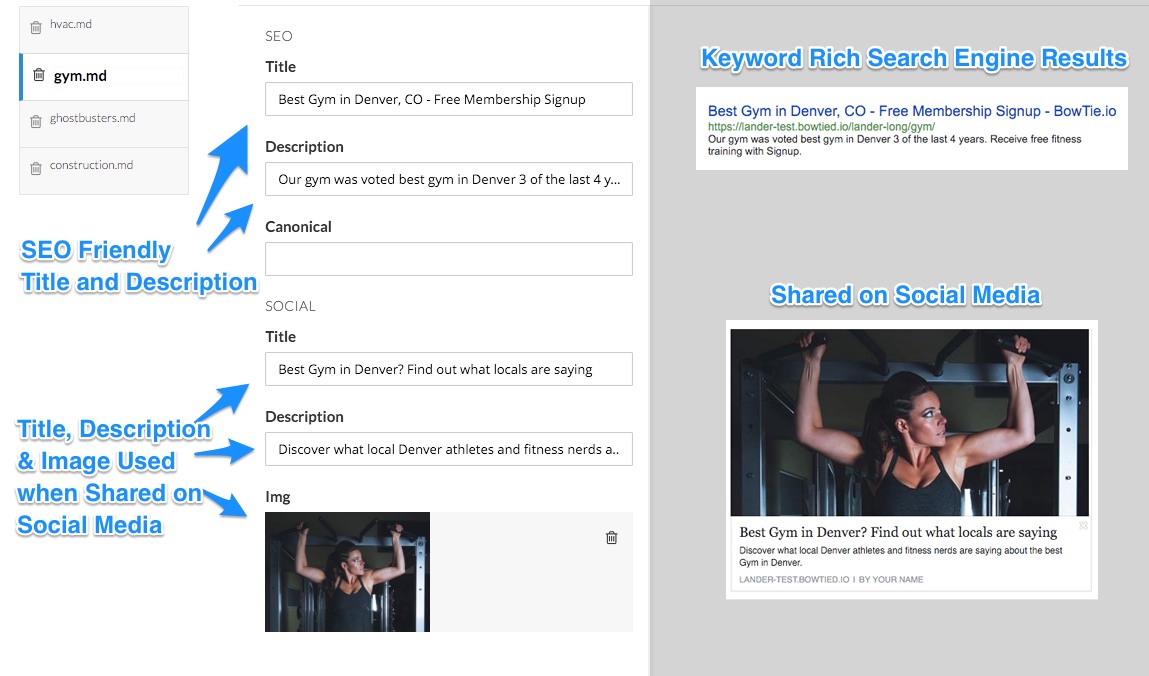
Search Engine Optimization
When defined, the SEO title and description will be used for your page title and description. Search Engines display this information in search results. The keywords used in your title also help spiders know what your content is about and can help increase your pages ranking.
If these fields are left blank, Jekyll with use the page.title and site.description as a fallback.
Toggle ‘Noindex’ to automatically add the meta tag <meta name="robots" content="noindex, nofollow"> to your page header. If respected, this tag will stop robots from indexing your page.
The Canonical field is a way to let Search Engines know when credit for your content belongs elsewhere. This is a good idea if you are posting duplicate content and wish to avoid potential penalties. More on using Canonical on SEOmoz.org.
If the canonical field is left blank, the current page.url will be used to define this as the content source.
Social Media
Define a Social Title, Description and Image to be used when your content is shared and displayed on social media sites such as Facebook and Twitter. If left undefined, social media sites will often default to the page title and description.
Formatting with Markdown
Markdown is a writer’s tool. Once you learn how to use a few simple special characters, you’ll be off to the races. Markdown is a a simple syntax to learn, even if you don’t know HTML or another language. That said, one the coolest features of Markdown is that supports HTML. If you can’t get the exact formatting you are looking for, you can fall back to standard HTML as needed.
If you are working with our online editor, click the question mark in the editor header to reveal some simple Markdown tips:

Use the following guide to learn the most common markdown elements. It’s not meant to be exhaustive. For a more complete Markdown reference, we recommend you check out this guide, from John Gruber, the creator of Markdown.
Text
Italic and bold text transformation is done by wrapping the text you want to transform in asterisks or underscores as shown below.
Code
*italic* or _italic_
**bold** or __bold__
***bold-italic*** or ___bold-italic___
Result
italic or italic
bold or bold
bold-italic or bold-italic
If you’re new to Markdown, you might have run into similar formatting using popular services like Basecamp, Wikipedia, and even Slack.
Links
BowTie supports inline and reference links:
Code
[example](http://example.com)
[docs](/docs/)
or
[link][1], [link2][2]

[1]: http://example.com
[2]:  https://razorsite.co
Result
or
Place standard brackets around the word you want to apply the link to, followed by the URL to be linked in parenthesis. Reference links are convenient if you are linking the same URL multiple times in an article. For those, follow your link with bracketed reference (number or word), then add the URL elsewhere on the page as shown above.
You’ll also notice the title attribute added to link 2. Anywhere you use a URL, you can follow it with a “title in quotation marks” to generate a title attribute.
Headings
Headings (H1, H2, etc.) are created by preceding a term with a hashmark or pound sign. The number of hashes will set the heading level. You can style your headings with the theme.scss stylesheet as detailed in this post.
Code
# Heading 1
## Heading 2
### Heading 3
Result
Heading 1
Heading 2
Heading 3
Images
Inserting images is very similar to adding a link:
Code

Result

Add your image to your repo, then reference it as shown above or link to an image on a another server using the full URL. Title tags are optional and can be included by following your img reference with text in parenthesis.
Image layout options
Classes can be added to an image in markdown using the format shown below. We’ve also added a few helper classes to make image layout easier within your posts.
You can use the helper classes ‘.half’, ‘.third’, ‘.quarter’, and ‘.threequarter’ to set the width of an image quickly. We’ve also created helper classes to add a 40px buffer on the left or right of your image (‘left-buffer’ and ‘right-buffer’, respectively.) Here is an example:
Code
{: .quarter .pull-left .right-buffer}
Integer ullamcorper justo in nunc condimentum, at placerat tortor malesuada. Maecenas eget est suscipit, blandit leo egestas, egestas purus. Mauris vitae lorem ac purus eleifend rhoncus.
Result
Integer ullamcorper justo in nunc condimentum, at placerat tortor malesuada. Maecenas eget est suscipit, blandit leo egestas, egestas purus. Mauris vitae lorem ac purus eleifend rhoncus.
If you’d rather include HTML with Bootstrap classes (e.g. <img class="img img-responsive" src="/img/markdown.png">), go for it.
Lists
Writing lists in HTML require a lot of markup. Markdown lists are much simpler. For a bullet list, precede the item with a *, -, or + and they will be converted to dots. Use 4 spaces to indent a line you wish to nest.
Code
* BowTie
* Necktie
    * Bolo
* Ascot
* Scarf
Result
- BowTie
- Necktie
- Bolo
- Ascot
- Scarf
Numbered lists are just as easy. Precede each list item with a number and period as seen below.
Code
1. BowTie
2. Necktie
3. Bolo
4. Ascot
5. Scarf
Result
- BowTie
- Necktie
- Bolo
- Ascot
- Scarf
Block-quotes
Add a ‘>’ in front of a line to convert the text into a block-quote.
Code
> Markdown is the bomb.
Result
Markdown is the bomb.
Horizontal Rules
There are two ways to add a horizontal rule. Use three dashes, or the standard HTML fallback <hr>.
Code
---
or
<hr>
Result
or
Tables
Tables in markdown use dashes and pipes to suggest the the table cells. While tables can be difficult to format on small screens, the BowTie theme makes your tables responsive, breaking clean on small screens by adding a single .responsive class.
Code
| Date | Title | Notes |
| ---  | --- | --- |
| 12-01 | Ship | Get sh#t out the door |
| 12-03 | Launch | The sooner we do this, the better |
| 12-06 | Release | Often, as the result of feedback |
Result
| Date | Title | Notes |
|---|---|---|
| 12-01 | Ship | Get sh#t out the door |
| 12-03 | Launch | The sooner we do this, the better |
| 12-06 | Release | Often, as a response to feedback |
Code Snippets
If you’re writing about code or producing documentation, you may need to render a particular syntax. Using a single back-tick around a word will produce an inline snippet.
Code
When referencing `code` inline
Result
When referencing code inline
Indenting 4 spaces, or using the liquid {% highlight %} tag will produce a pre block, similar to the ones used throughout this post.
The {% highlight %} tag supports syntax highlighting for multiple languages. For more information, check out the Jekyll docs.
Code
<span class="author">by </span>or
{% highlight html}
src="{{ site.logourl }}"
{% highlight html}
src="{{ site.logourl }}"
{% endhighlight %}
Result
<span class="author">by </span>


src="{{ site.logourl }}"
Result
*example*
Using HTML
If your needs exceed the capability of Markdown, you can add HTML snippets seamlessly to your posts and pages. You’ll see this throughout the BowTIe templates and components. You can also add javascript, iframes, and video embed code with ease.
Our default theme includes Bootstrap, so you can add your favorite bootstrap classes where needed.
Code
<button class="btn btn-default">Bootstrap Rules</button>
Result
More Options
This guide is far from exhaustive. If you want to take BowTie to the next level, check out our user management and policy systems to learn how to accept simple donations or launch a site with a paywall using Stripe.
You can find our blog template on GitHub here. To learn how to extend your blog even further, read the Jekyll support material.
If you are new to BowTie, check out our other Getting Started guides.
Getting Started with BowTie:
- Build a Landing Page in 5 minutes
- Using the BowTie Collection Editor
- Initial Configuration
- Setting Up Custom Domains
- Customizing and Styling BowTie frontend content
- Build a website with a pay wall
- Blogging with BowTie
- Launch a simple donation site
- Using BowTie’s User Profile system
- Build a Daily Deal Site with Jekyll Collections
- Using Jekyll Data to extend your site
- Adding BowTie users to MailChimp with Zapier
To keep up to date, follow us on twitter at @bowtie_io
Questions? Please comment! Thanks for your support and feedback.