
This post describes the basic configuration of a BowTie provided Jekyll template expected to be performed by the site developer or designer. If you are using the hosted editor to update content on your site, begin with our getting started guide or request a workflow from the developer who set up your site.
You can use any static site generator with BowTie, the information here is specific to BowTie-provided Jekyll templates.
For Designers/Developers
BowTie templates are built with Jekyll, you’ll be using global configuration options available in the Jekyll _config.yml to set up site-wide defaults. I’ll also introduce the process for creating client-editable collection content. To learn more, reference our guide on building custom collection interfaces for your clients. We provide additional detail for working with BowTie templates in our guide on blogging, our collections guide, and our theme guide.
In this post I’ll highlight the variables added to your _config.yml file by the BowTie theme, explain how to personalize a site, and show you how to extend the library of BowTie components and templates. To learn more about Jekyll’s default configuration options and how to configure Jekyll at the CLI, visit the Jekyll Docs.
This guide assumes you have already setup your local environment, cloned your project repository, and are working with a Jekyll based theme/template provided by BowTie.
Global Configuration
The default configuration file _config.yml contains a mix of comments and placeholder information designed to help you update your site options. Additionally, BowTie adds a number of fields to the _config.yml that can be used to populate information throughout our templates.
You can modify the _config.yml with any text editor. When you push changes your site is rebuilt and deployed.
Learn more about working with BowTie templates
BowTie config.yml

The _config.yml is found at the root level of your Project repository. Begin by updating global information about your site and business. We recommend you set a customer service email address, your logo/avatar, and a Google analytics ID (if used).
These variables populate site and author information into your page headers and various BowTie templates and components. For example, email is used in a component on the /about/ page.
BowTie Theme additions
The ‘Theme’ section of the _config.yml contains variables used by our default templates. If you don’t plan to use BowTie templates and components, you can comment these out or remove them.
BowTie theme variables
If you plan to use the blog templates, we recommend you fill out and use the authorship section of the theme settings. Define individual authors in your _config.yml according to the example data. By default, we include a display name, email address, website link, Gravatar URL, GitHub, Twitter, and Facebook link. (If you want to add or change social links, etc. simply reverse engineer the methods used in this example data.).
To add a new author, copy/paste the block and modify each entry in use. Be sure to match the indentation level set by the example.

Additional settings include permalink style and pagination limits. We’ve also added Jekyll build locations so you can decide where Jekyll will read and write files. Additionally there’s an exclusion list for files you would like to omit from the Jekyll build process, so you can leave out files that you don’t want published. If you want to explore these settings further, read Jekyll’s docs on configuration settings.
Note: You can set and override permalinks on a page-by-page basis using the frontmatter in that page. To learn more about permalinks configuration visit the jekyll docs.
Configuring Collections
To provide a customizable editing interface for non-technical users, we extend Jekyll collection objects. ‘Posts’ will be visible under ‘Collections’ in the BowTie dashboard by default. Custom collections need to be defined in the _config.yml as shown below.
Defining a Collection
To define a collection, include it in your _config.yml as shown below. Setting ‘output: true’ will render a page from each collection object. You can also specify a default permalink structure.
collections:
  authors:
    output: false
  offers:
    output: true
  products:
    output: true
    permalink: /products/:path/
You can define the interface and default content for each collection using a _fields.md file. To learn more, follow these detailed instructions for configuring and working with the BowTie Collection Editor.
Using Configuration Variables In Your Site
Global variables
To use the variables we define in the _config.yml inside a template or post, reference the variable in a liquid tag, preceded with ‘site.’ For example, a reference to your site logo file would look like this:
src="{{ site.logourl }}"To reference fields in the ‘Theme’ section of your config file, you will need to extend ‘site’ to ‘site.bowtietheme.X’ where X is the next indented header (indentation seen in the _config.yml file). For example, a reference to your company city would be:
"{{ site.bowtietheme.contact.city }}"
Post Authors
For blog posts and page authorship we define the ‘author’ in a collection, then assign them in the post/page.
You can add authors with the online editor, or by manually creating a markdown file inside the _authors collection directory. Our standard components will use the author’s displayName, avatar, gravatar, social handles, etc. in posts, post summaries, article headers and open-graph information.

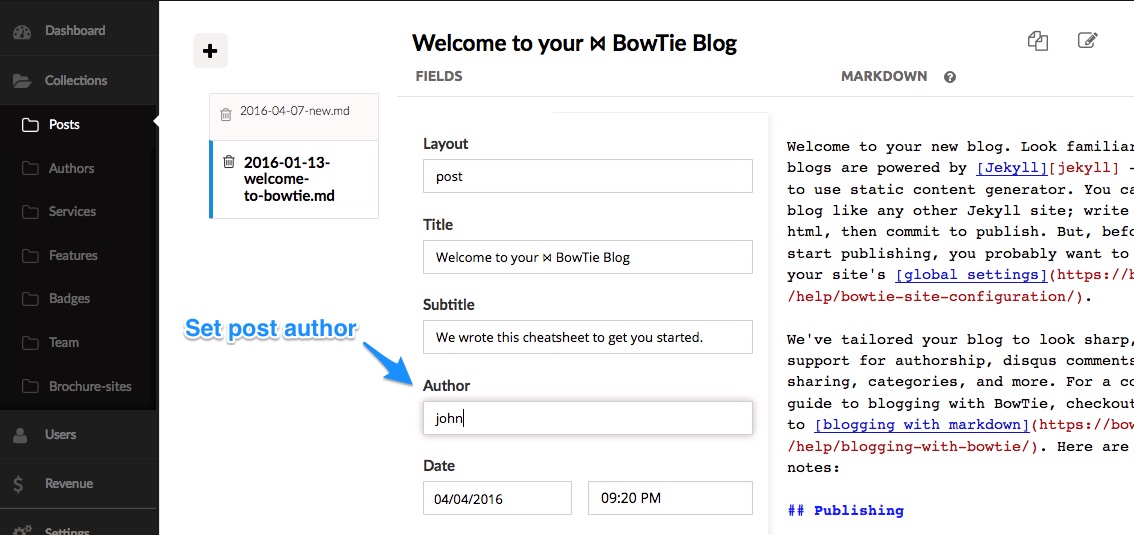
After you have added an author, set the author in the post/page front matter with the value from the author’s ‘name’ field, or using a field in the collection editor.
Post Content Front Matter
---
author: john
---
Define Author in a Post Field Using the Collection Editor
Template Logic
Here’s the liquid logic I use to call the authors defined from my Jekyll collection into the template.
{% if page.author %}
  {% assign author = site.authors | where:"name", page.author | first %}
{% endif %}
Now I can extend author information throughout the page (based on the variables defined in the collection):
{% if author %}
  <img class="img post-avatar" src="{{ author.avatar_path }}>
  <span class="author">by {{ author.displayName }}</span>
  {% if author.twitter %}
    <span class="author-twitter"><a href="//twitter.com/{{ author.twitter }}"><i class="fa fa-twitter fa-1x"></i></a></span>
  {% endif %}
  </span>
{% endif %}
For more examples using collection based content, read our guide on building a Daily Deal Site with Jekyll Collections or extend your project even further with Jekyll data files and variables.
More Options
Static landing pages and markdown blogs are just the beginning. BowTie’s user management and policy systems make it easy to prototype and launch almost any web application. Looking for the next step? Learn how to accept simple donations, or launch a site with a paywall using Stripe.
If you’d like to see our pre-built templates on GitHub, check them out here. For even more options, read our Getting Started series:
If you are new to BowTie, check out our other Getting Started guides.
Getting Started with BowTie:
- Build a Landing Page in 5 minutes
- Using the BowTie Collection Editor
- Initial Configuration
- Setting Up Custom Domains
- Customizing and Styling BowTie frontend content
- Build a website with a pay wall
- Blogging with BowTie
- Launch a simple donation site
- Using BowTie’s User Profile system
- Build a Daily Deal Site with Jekyll Collections
- Using Jekyll Data to extend your site
- Adding BowTie users to MailChimp with Zapier
To keep up to date, follow us on twitter at @bowtie_io
Questions? Please comment! Thanks for your support and feedback.