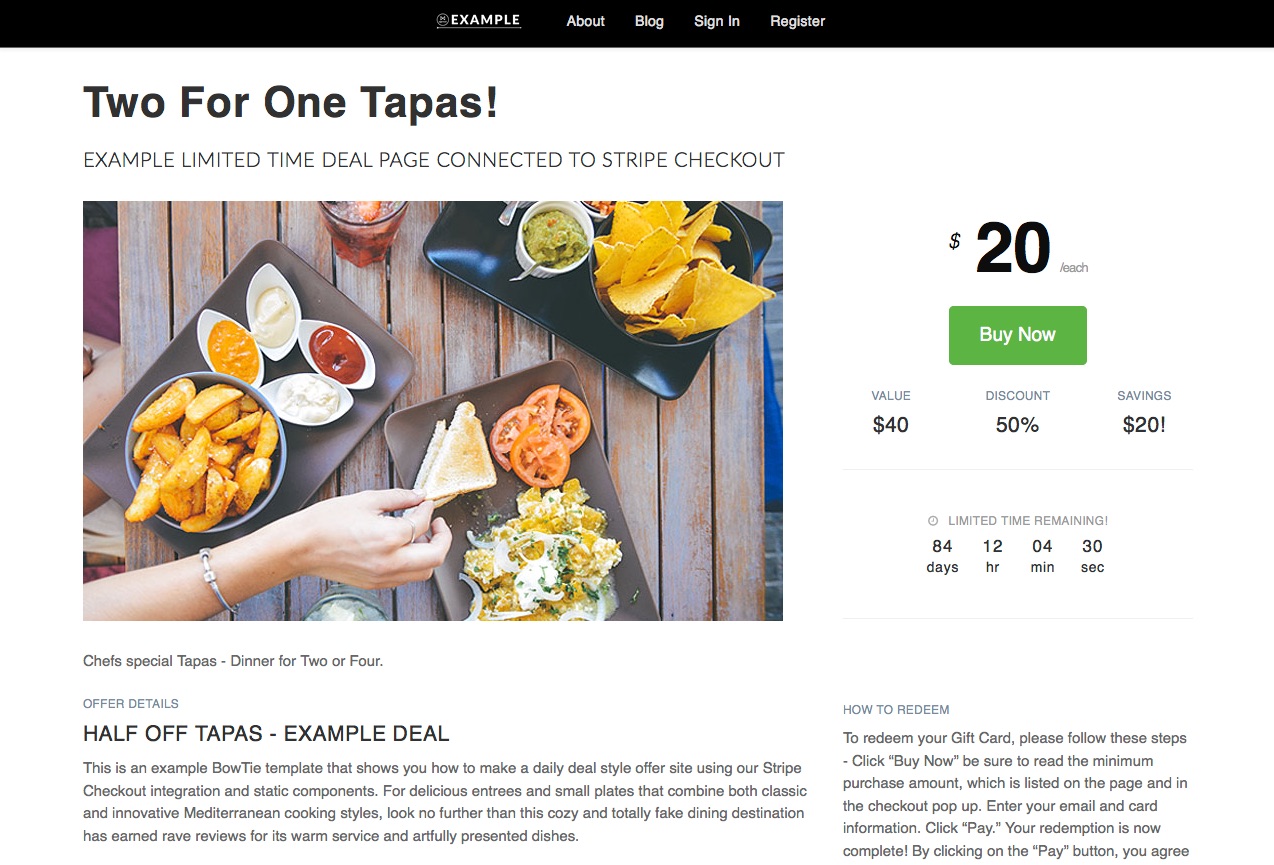
A marketing agency recently reached out for help creating a Groupon-style daily deals site for their clients. Their goal was to be able to quickly create ‘special offer’ pages that could capture secure payments without having to worry about scale or security. This was a good use case for a BowTie project that takes advantage of our Stripe Checkout integration, and the functionality included in Jekyll data files.
This post will walk you through the process of creating your own ‘special offer’ site, customizing BowTie’s frontend components, using BowTie ‘product’ records with Stripe Checkout, and customizing Jekyll data files for use in your frontend. You can view the example project hosted on BowTie, and download the templates from our github page.
Please Note: An updated guide and jekyll ecommerce offer template using collections has been release.
Static Daily Deal Site
Setting Up Your Project
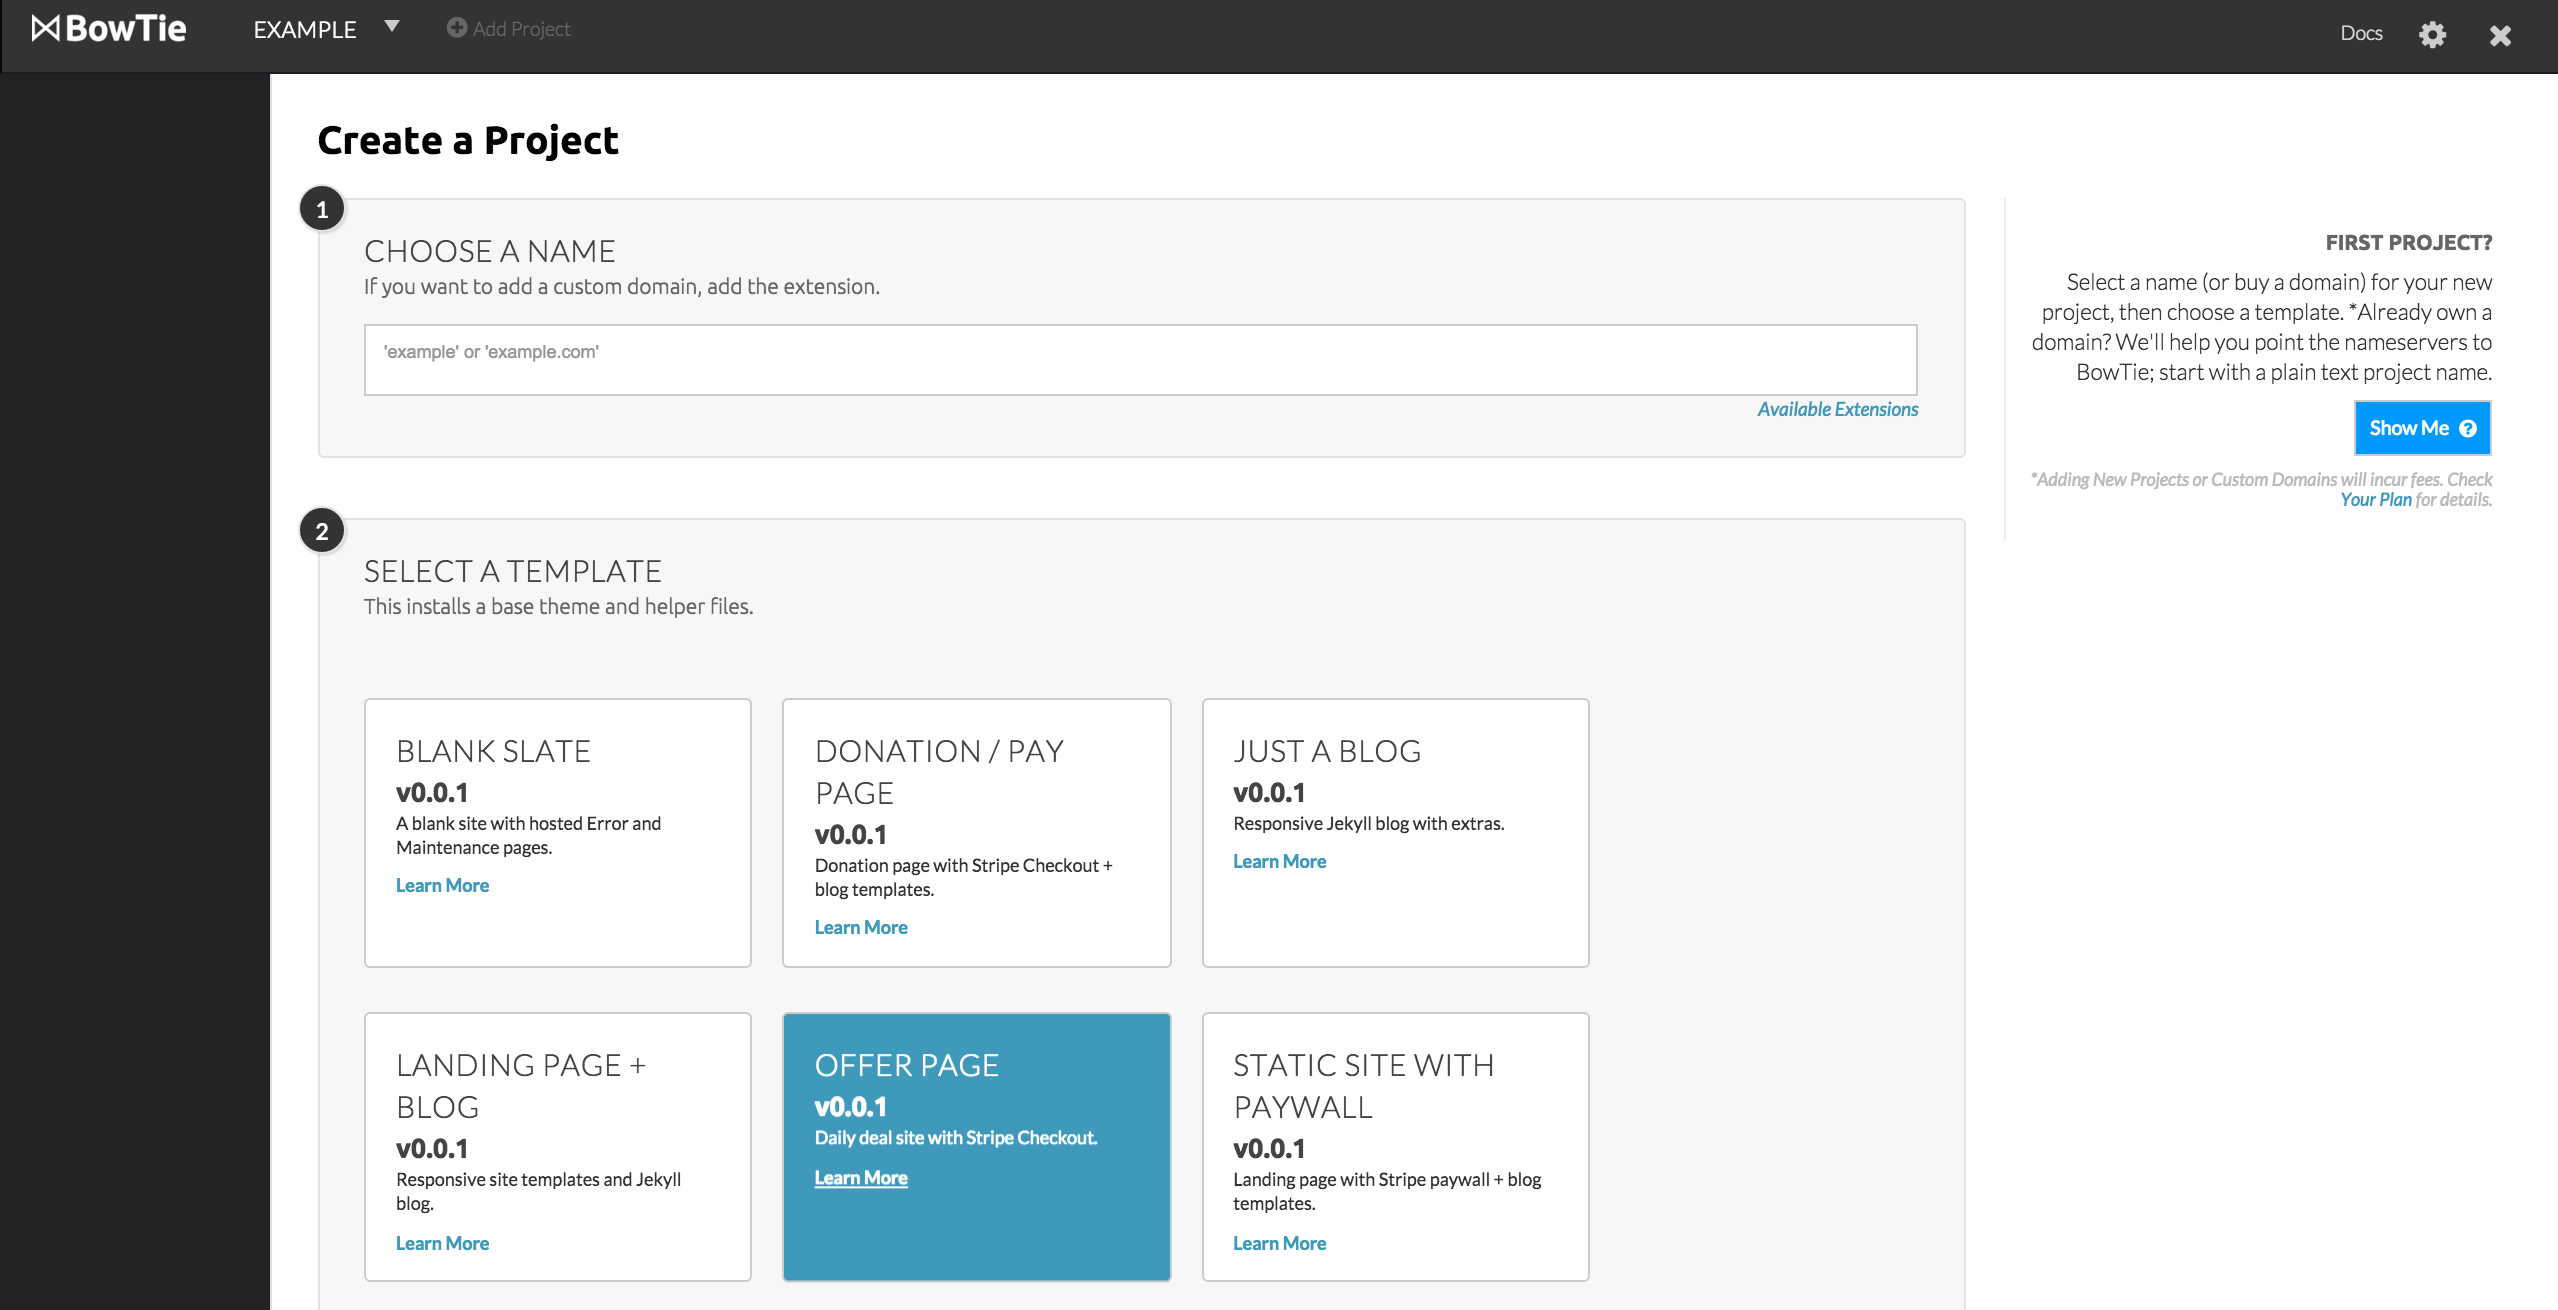
To begin, select the ‘Offer Page’ template. This will deploy the exact files used in this post. However, you can use data files, create policy files, and enable Stripe Checkout in any BowTie project. The ‘Offer Page’ template is meant as a guide and educational resource.
Install the Offer Page template
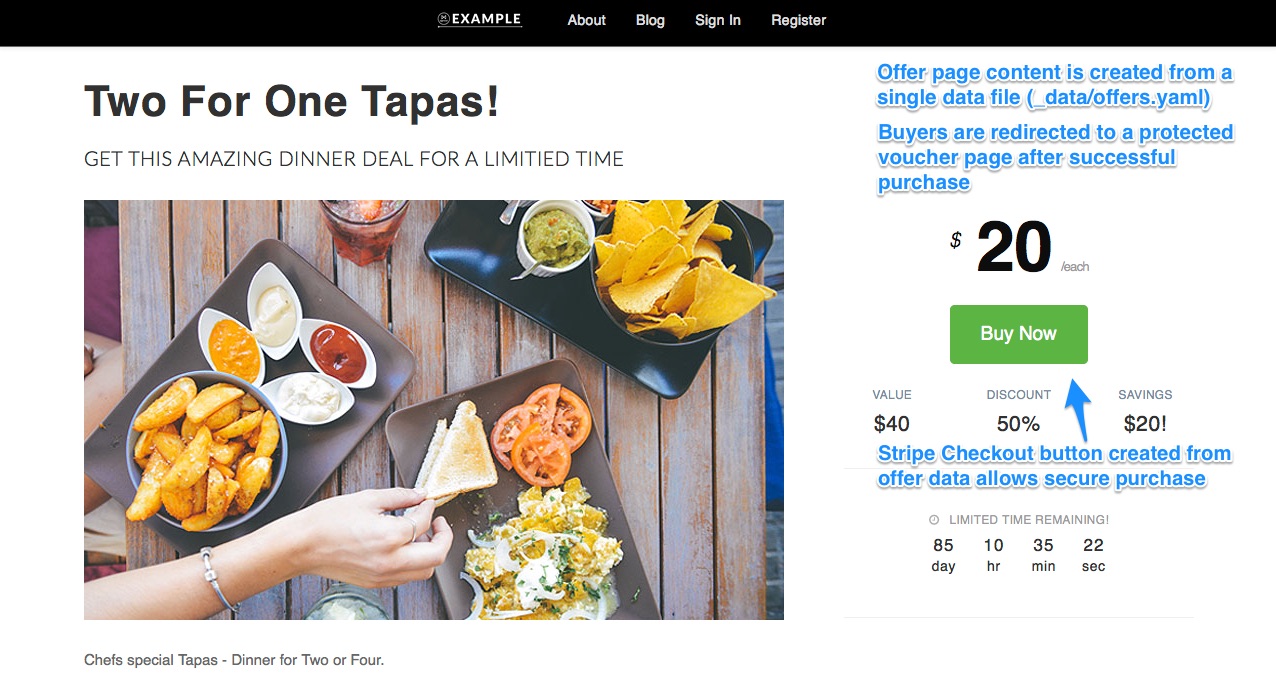
This template deploys a standardized and easily repeatable ‘offer’ page. The offer details are located in a Jekyll data file. This allows you to post new offers in as little as a few minutes with very little modification to the project code.
Offer details draw from a file in the _data directory of the project repo. This is used by BowTie’s components similar to the variables found in your site configuration file.
Offer purchases are made using Stripe checkout. I’ll show how to configure a BowTie product for each offer, but for an in-depth explanation of our Stripe Checkout integration, you should read this guide.
Following a purchase, the user or visitor is directed to a voucher page, secured by a BowTie policy file. Policies are controlled by adding .bowtie.yml files in the directory you would like to protect. In this example, I set up a /voucher/ directory, assuming that each offer could live in a uniquely protected subdirectory, with access limited based on purchase status.
This template uses the default Bowtie theme with a few custom image assets and style modifications. Read this guide to learn more about theming your BowTie site.
Example Offer Site Behavior
Using Jekyll data files
The components used in this template leverage Jekyll data. This is one of my favorite aspects of Jekyll. Data files contain key value pairs that can be inserted as custom variables throughout your BowTie project. You can access data using Liquid tags, similar to the method use to call theme information from your config.yml file.
Jekyll supports YAML, JSON, and CSV data files. For this example, we are using the offers.yml files found inside the _data directory. This file can be called using site.data.offers. You can create additional data files in the _data directory or a subdirectory. The filename determines the variable (e.g. /_data/subdirectory/example.json = site.data.subdirectory.example).
Your pages and posts can access data in several ways, as detailed by the Jekyll docs. In this example, I’ve formatted the data such that pages and posts can access a specific offer, and any of the variables contained within that offer. The attributes for each offer are tab indented below it, like so:
offer1:
  variable: value
  variable:
  variable:  # (everything after hash is a comment)
offer2:
  variable: value
Creating Offers
Creating Data
To create a new offer, you will need a new entry in your offers.yml data file. Copy and paste the block of variables from an existing offer, and assign a new offer name.
Most of the components used to build the offer page exist in a subdirectory called _includes/deal-sections. You’ll see data.offers variables sprinkled throughout. I have also converted the checkout-button.html include to use these variables. Explore the data file and includes to see what is available.
Note: Data entries are plain text. Please avoid adding HTML or special characters. Anything that follows a ‘#’ is considered a comment.
Data file format

Page Content
To publish an offer page you need to create a page or post in the project (html or markdown), and associate it to an offer entry in the data file.
The ‘tapas’ offer is contained on the /index.html file. We make the association to the data file in the page’s front matter, where you see variable offer: tapasoffer.
After the front matter you’ll see a liquid statement that assigns the offer data to any page element or include used on the page, and allows us to use shorter syntax to call offer variables (e.g. {offer.price} instead of {site.data.offer.tapasoffer.price}):
{% if page.offer %}
  {% assign offer = site.data.offers[page.offer] %}
{% else %}
  {% assign offer = site.data.offers.defaultoffer %}
{% endif %}
Page content generated from data
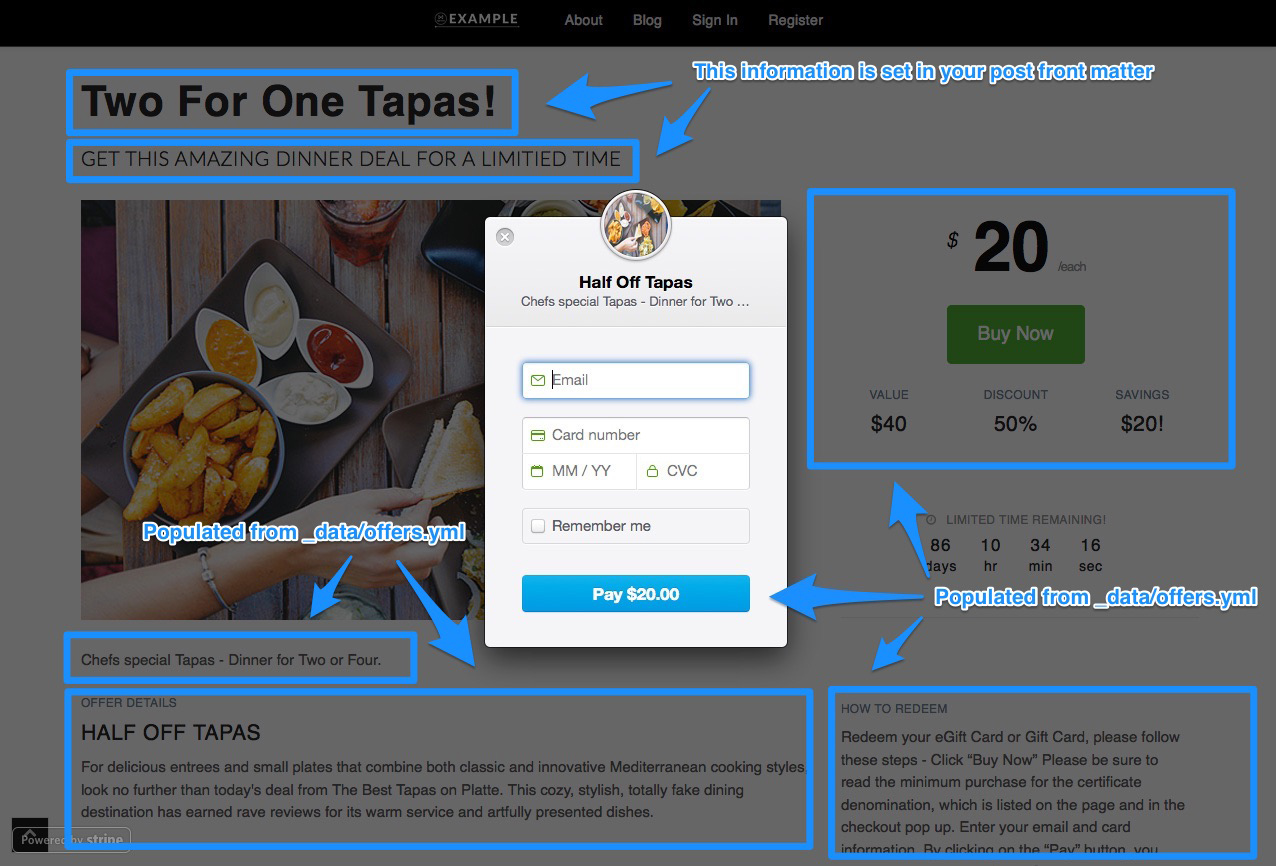
To create a new offer, duplicate the /index.html and update the front matter to reference another offer entry in your _data/offers.yaml file.
Note: If you create a deal page or post that has no offer assigned, or conflicts with another offer, your page won’t work.
You can rearrange or customize the included components as desired. To learn more, read our guide on frontend customization.
Configuring Payments
Connecting BowTie to Stripe
If you haven’t done so, sign up for a Stripe account and connect it via OAuth on the /projects/PROJECTNAME/stripe_connection page in your BowTie dashboard. (A successful connection will display an indicator reading ‘Active’ in your sidebar.).
This connection allows you to create and store the tokens needed to use Stripe Checkout, associate purchases with BowTie users, and view and refund payments within your BowTie project dashboard.
Note: Your BowTie project has two environments, Development and Production. Stripe charges and user records are environment specific. Your Production environment is connected to Stripe’s live mode, and Development is connected to Stripe’s test mode.
Creating a BowTie Product
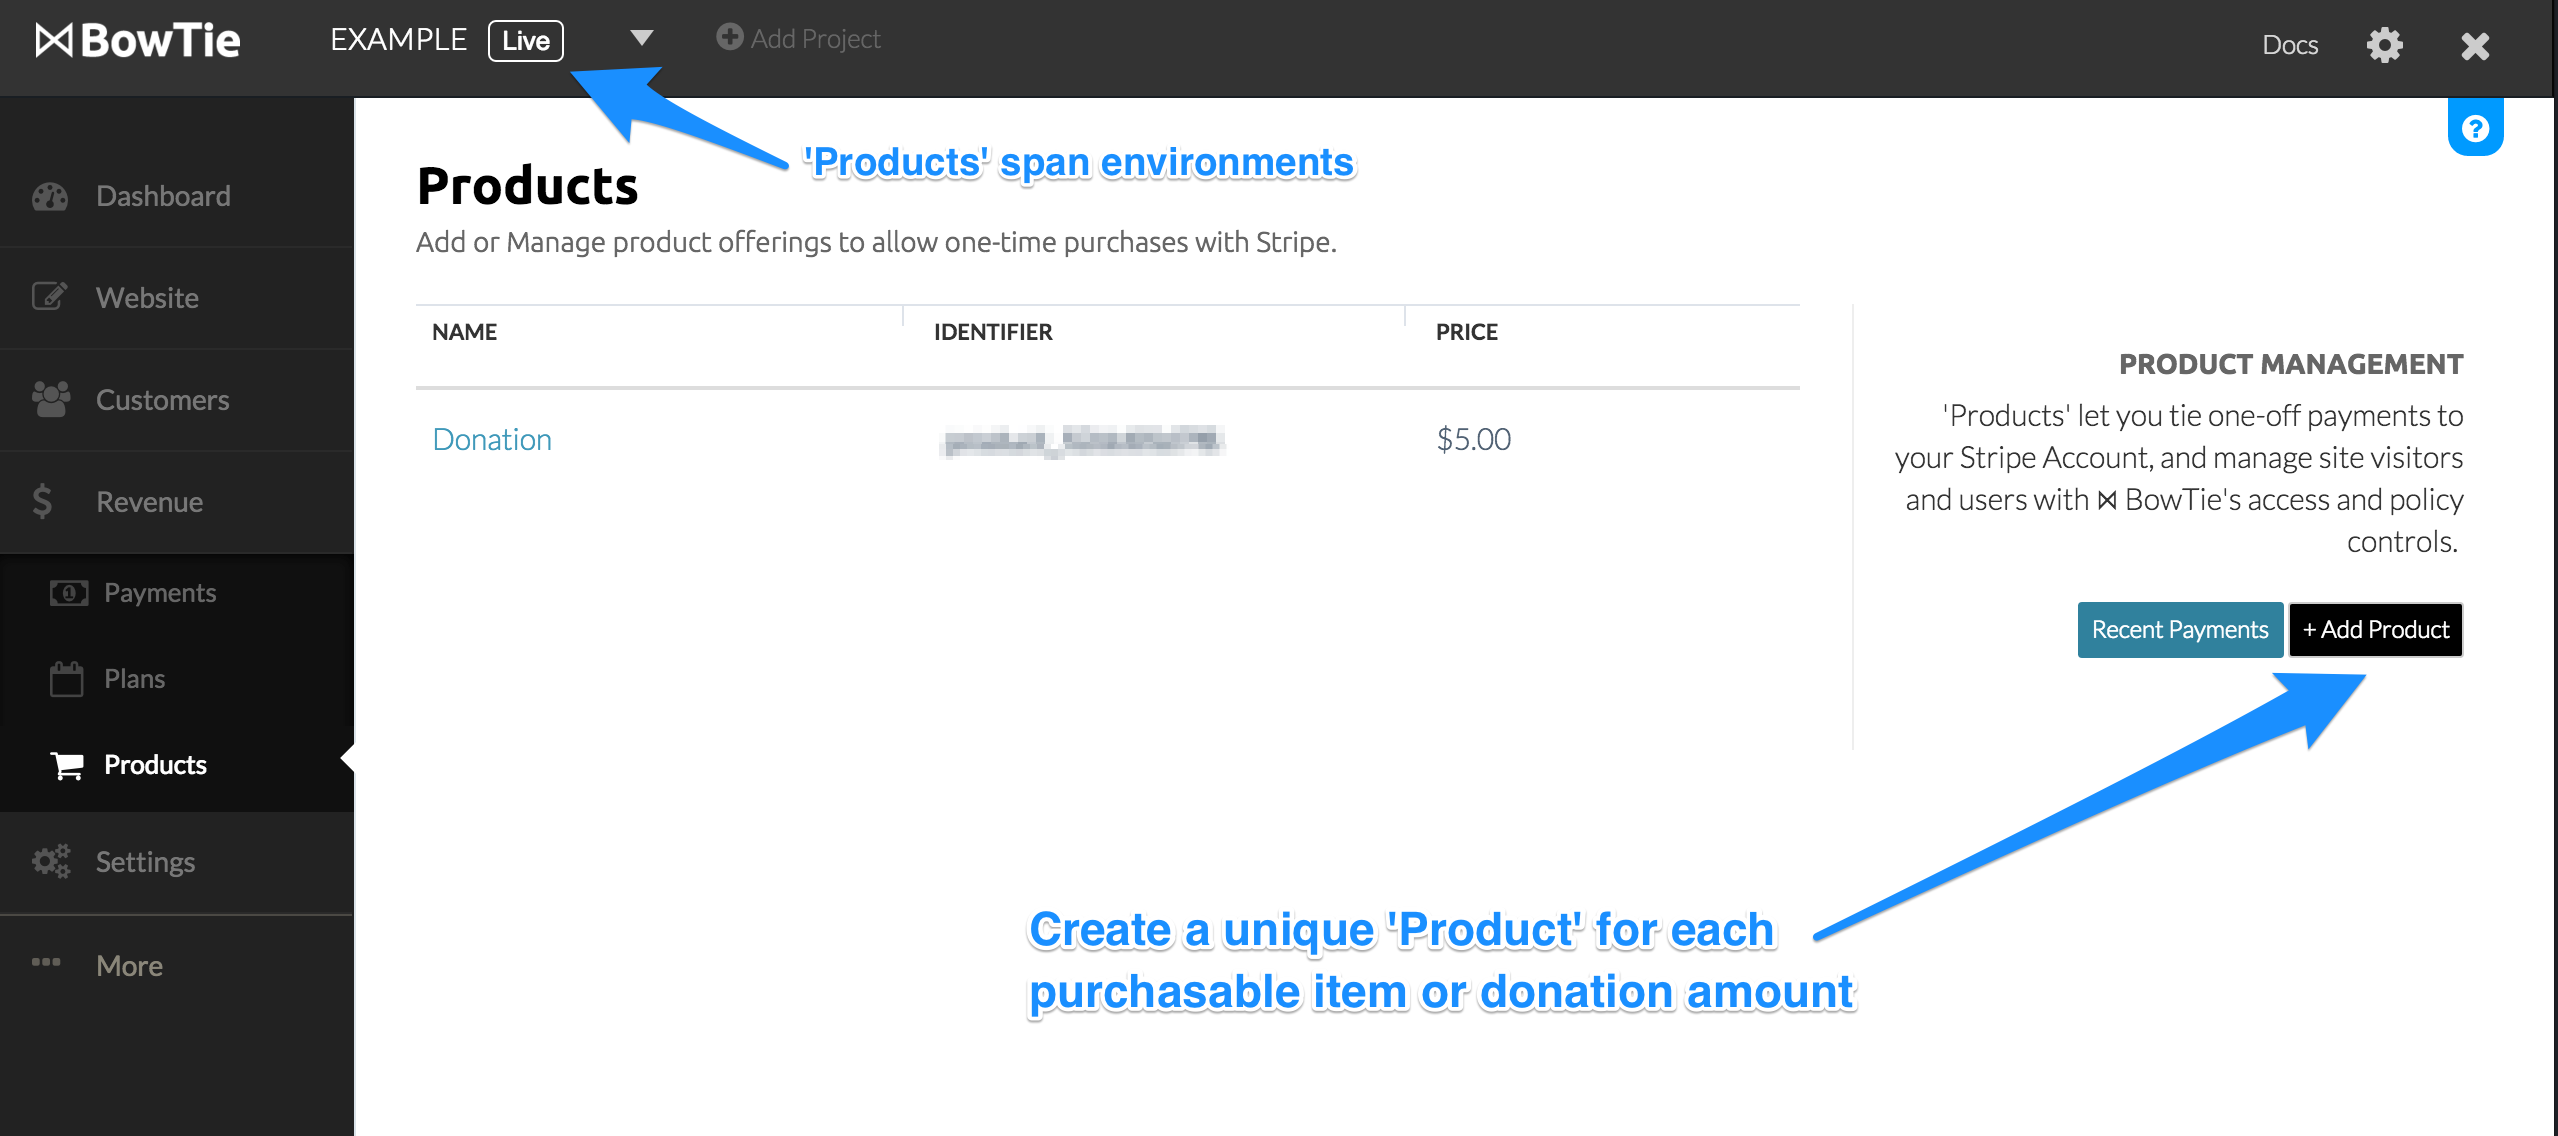
After connecting to Stripe, you’ll need to create a ‘Product’ record in BowTie. ‘Product’ records allow users to create charges from the tokens generated by Stripe Checkout without requiring a backend integration.
Unlike most project records, ‘Products’ span across all environments. This allows you to create a single product record and charge against it with test transactions in test and live transactions in live environments.
Navigate to ‘Revenue’ > ‘Products’ on your Bowtie dashboard. Click ‘+Add Product,’ set the attributes required, and save your product. In this example, each ‘special offer’ page requires a unique product record.
Note your new product’s ‘Identifier’ (e.g. ‘product_000000000’). This Identifier will be used in your offers.yml data file, outlined in the next step.
Using a Checkout Button with a data file
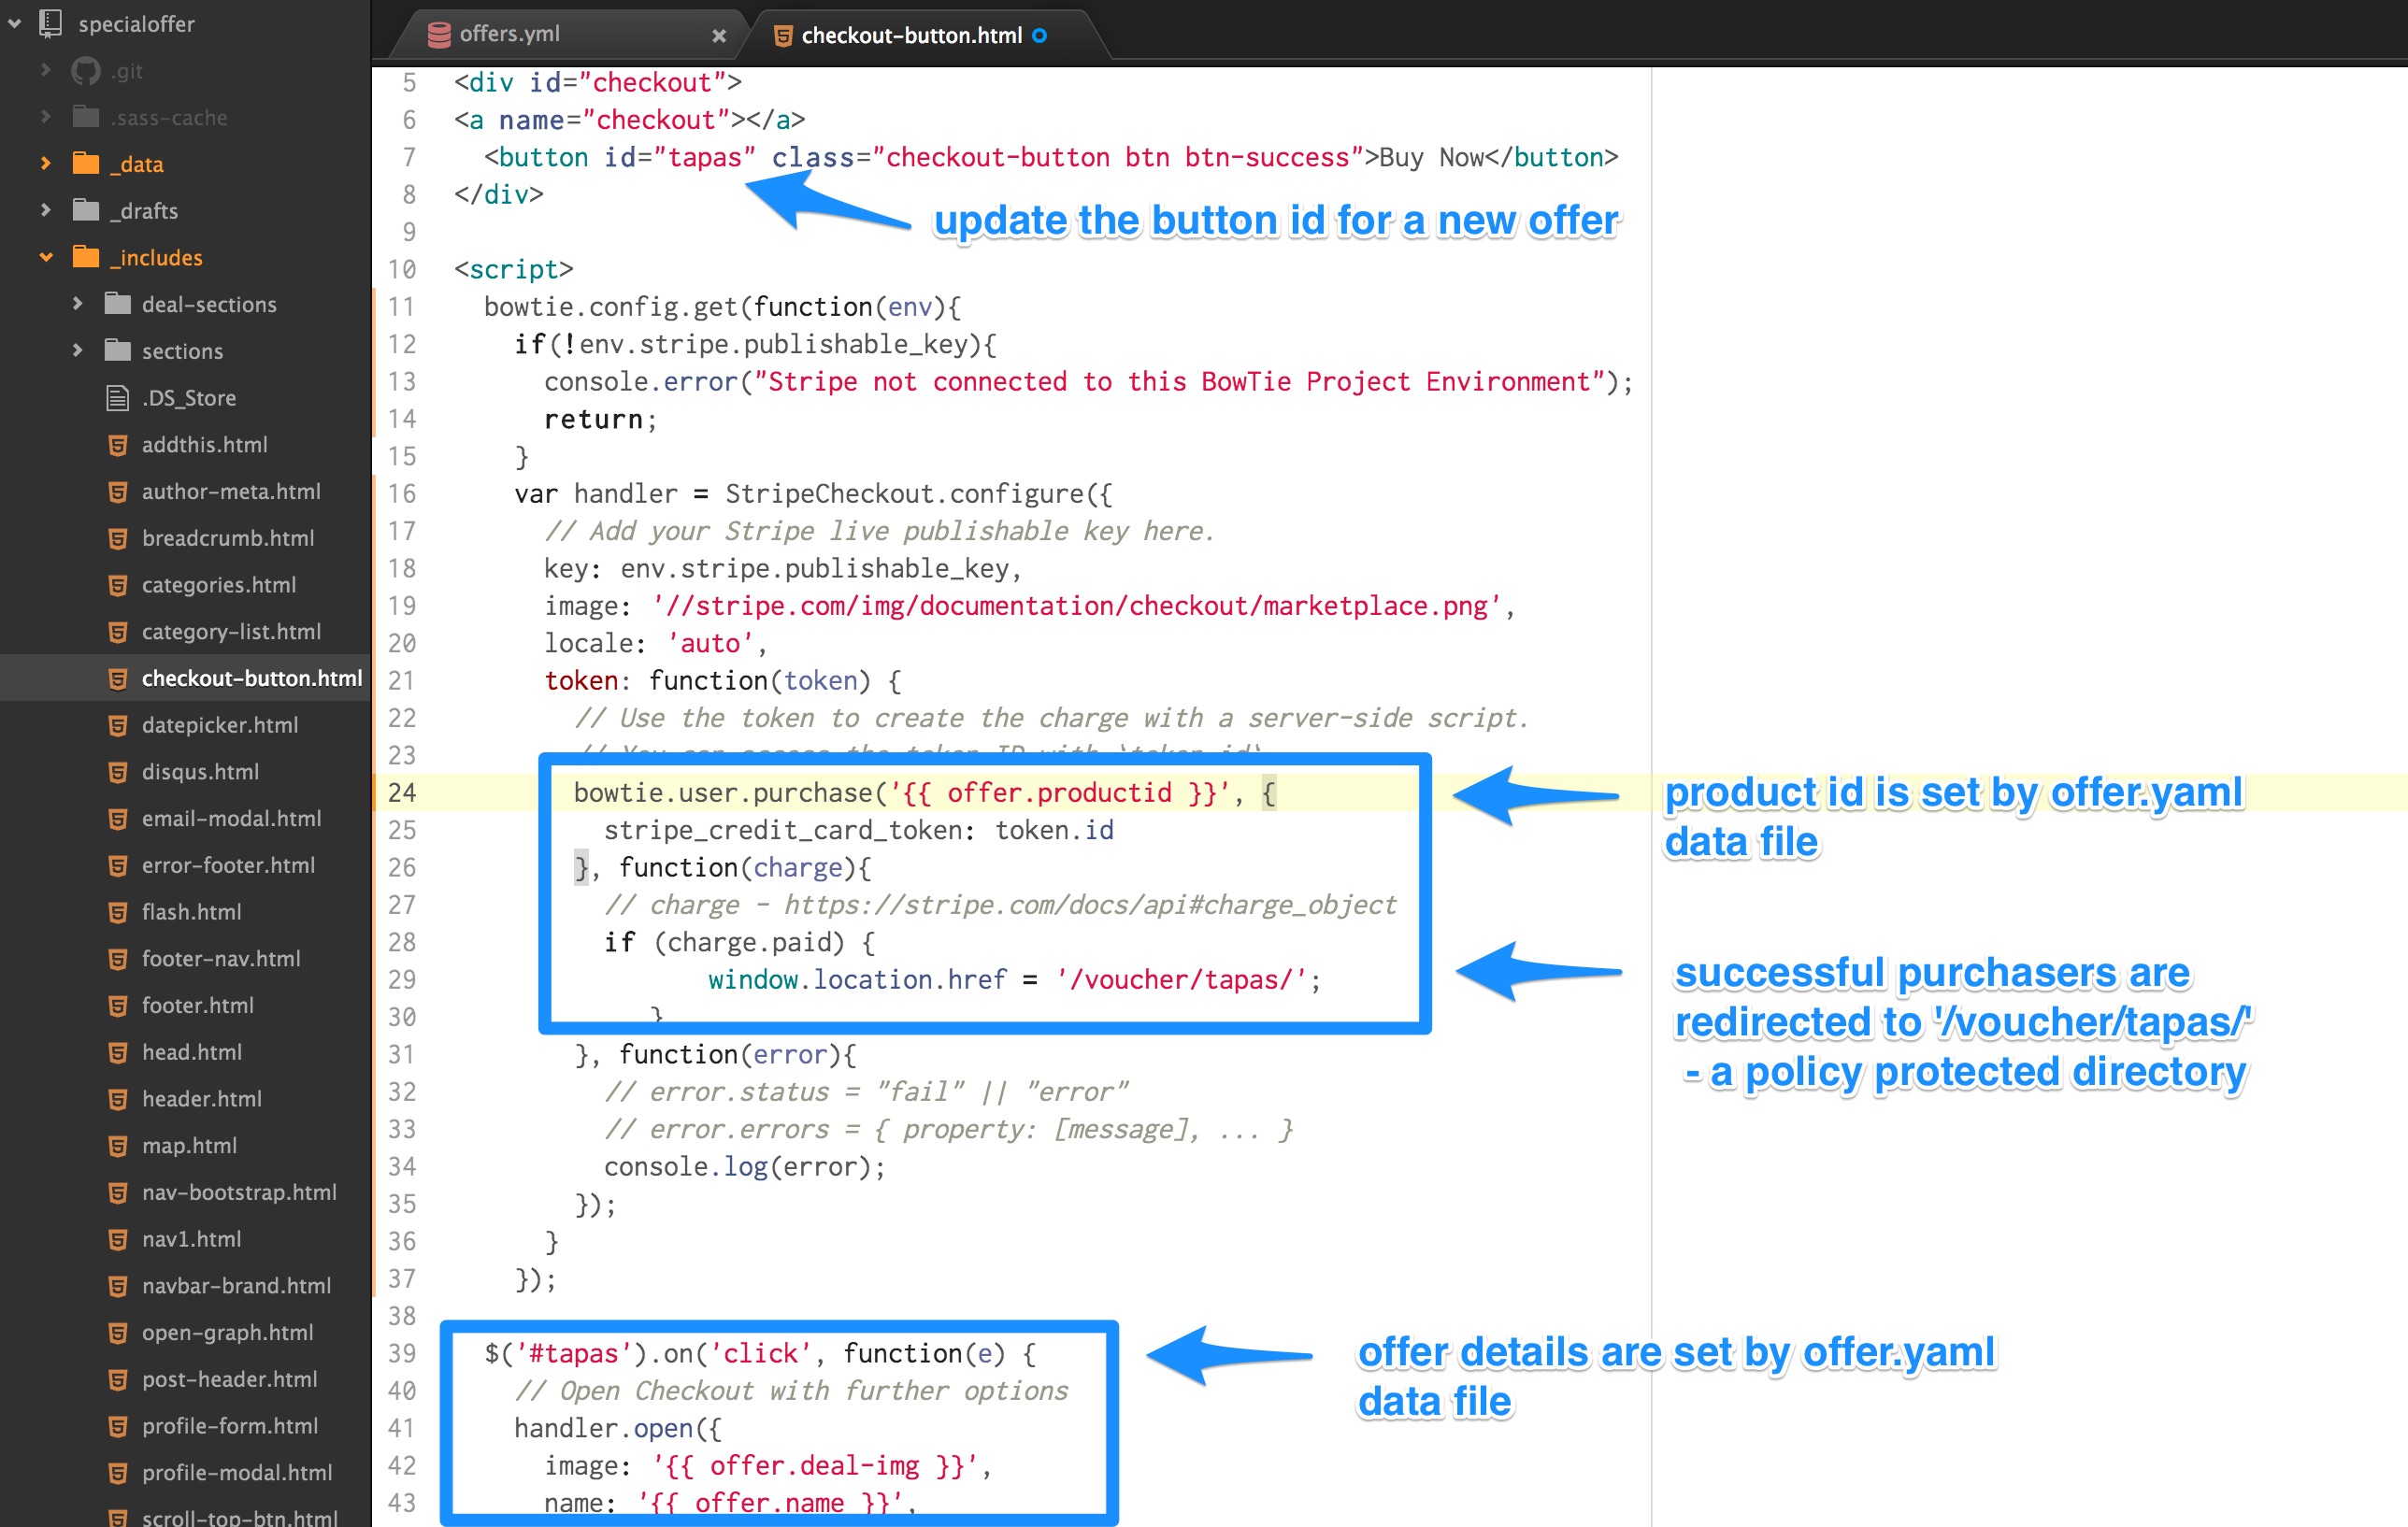
We include a sample checkout-button.html in this template. This can be used as is, replicated, or deconstructed as a guide. This button consumes information from the offers.yml data file (which is where you will insert your product identifier), and includes a redirect to a secure voucher page accessible after purchase.
If you intend to reuse this component, be sure to update the button id and corresponding javascript (id=”tapas” and #tapas in this example)
Stripe API Keys
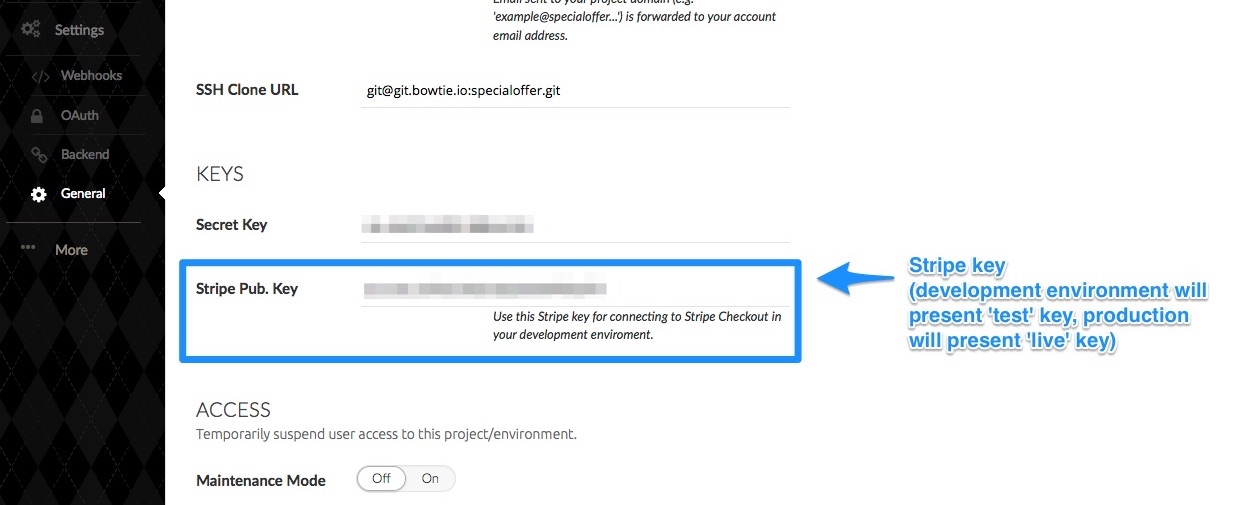
BowTie will auto-populate your Stripe API key into the checkout-button.html. Keys are environment specific, depending on what environment you’re working in, either test or live, and are updated automatically.
If you need access to your Stripe keys, you can find them listed on the ‘Settings’ > ‘General’ page for your selected project environment, or in your Stripe account.
Working with BowTie Policy Files
The BowTie payments profile allows you to set policies for both visitors and registered users who make purchases on your site. Policies are enforced by adding a .bowtie.yml file in the directory you wish to limit access to. Policy files can be created with any text editor.
Example policy file from /voucher/tapas/
A policy file includes what type of restriction exists and to what type of user.
# /voucher/tapas/.bowtie.yml

permits:
  profile:
    - purchases:
      product_853d0a7ba2: true
Access can be limited by user profile information, subscriptions, method, and path. For a detailed list of policy options, read our Docs.
‘Voucher’ policy file

In this .bowtie.yml file, you can see that access to the /voucher/tapas/ directory is restricted to users who have purchased the tapas offer. This allows us to host a unique voucher or secure content in this directory as seen below.
After purchase redirect
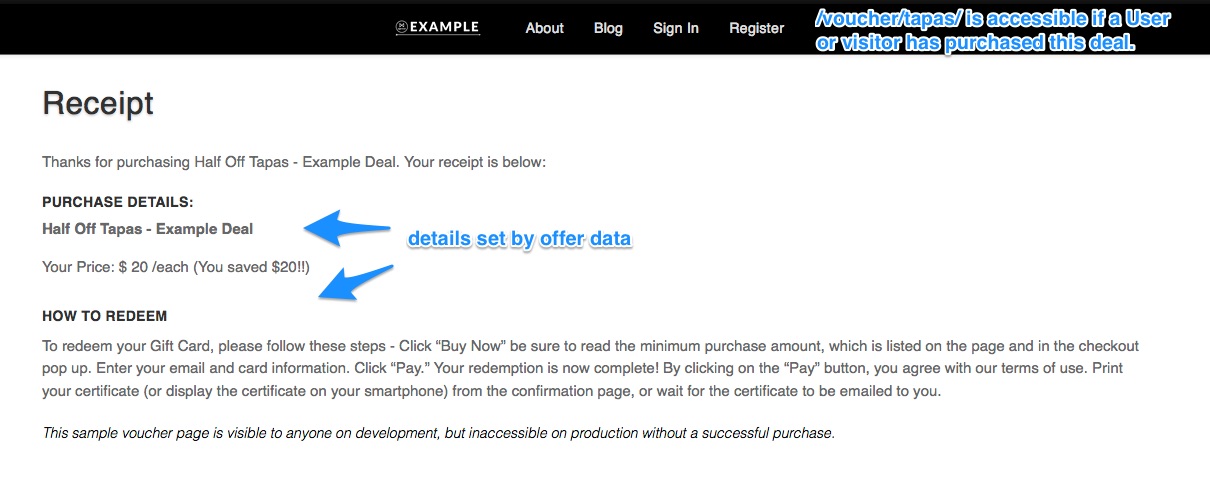
As dictated by the policy file and checkout-button.html above, successful purchasers will be redirected to this page /voucher/tapas/voucher.html. If a user attempts to access the content without making a payment, they will be denied access or redirected to sign in.
For additional functionality, you can use our Zapier integration to connect third party services. For example, on purchase you could automatically add the user to a mailing list and deliver an auto responder (such as a receipt or email voucher).
Congratulations! You now have a working daily deal site. You can use the above methods for any Stripe Checkout driven ecommerce project . If you need additional help with policies or payments, view our docs.
Subscription Restrictions
Looking for Subscription based payments and policies? Learn how to build subscription driven paywalls using Stripe plans in this guide.
If you’d like to see our offer page template on GitHub, check it out here. For even more options, read the our Getting Started series.
If you are new to BowTie, check out our other Getting Started guides.
Getting Started with BowTie:
- Build a Landing Page in 5 minutes
- Using the BowTie Collection Editor
- Initial Configuration
- Setting Up Custom Domains
- Customizing and Styling BowTie frontend content
- Build a website with a pay wall
- Blogging with BowTie
- Launch a simple donation site
- Using BowTie’s User Profile system
- Build a Daily Deal Site with Jekyll Collections
- Using Jekyll Data to extend your site
- Adding BowTie users to MailChimp with Zapier
To keep up to date, follow us on twitter at @bowtie_io
Questions? Please comment! Thanks for your support and feedback.